Full Drill vs Partial Drill Kits: Complete 2026 Comparison
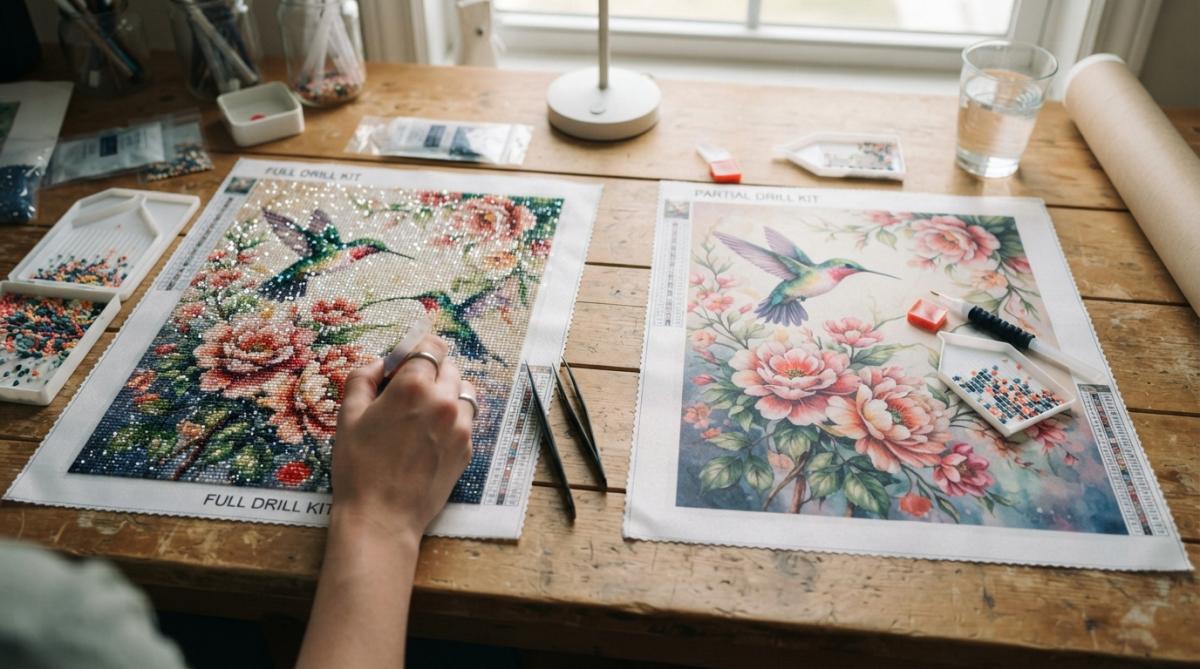
When you shop for a diamond painting kit, the choice between full drill and partial drill shapes everything about the experience, from the hours you put in to how the finished piece catches the light. The question isn't which one is "better" but which one matches your goals, your patience and the way you want the finished artwork to look. At Jeanne Argent, a small studio in Alexander, North Carolina, we sell full drill kits, and this guide lays out both options honestly so you can pick the one you will actually finish.
Quick answer: Full drill kits cover every square of the canvas with drills, so they sparkle edge to edge but take longer: roughly 15 to 20 hours for a 40 x 40 cm canvas and 45 hours or more for large formats. Partial drill kits drill only the focal areas and leave the printed background showing, so they finish faster and forgive small mistakes. Choose full drill for a statement piece, and partial drill or a small round-drill full drill kit for a quick first project.
In this guide
- Full Drill vs Partial Drill Kits: What's the Core Difference?
- Feature Comparison Table
- Which Should Beginners Start With?
- Round vs Square Drills
- Time Commitment and Difficulty
- How to Complete a Full Drill Canvas, Step by Step
- Finishing Your Work: Sealing, Framing and Storage
- Pros and Cons of Each Kit Type
- Which One Should You Choose?
Full Drill vs Partial Drill Kits: What's the Core Difference?
A full drill diamond painting kit covers the entire canvas with resin drills, creating a completely filled mosaic where every visible inch sparkles. A partial drill diamond painting kit leaves planned areas uncovered, so the printed artwork shows through while drills highlight the focal points and key details.
In practice, full drill kits take several times as long but deliver unmistakable impact when light hits them. Partial drill kits let you finish a satisfying project in a weekend or two, with far less strain on your hands.
What Is a Full Drill Diamond Painting Kit?
Full drill kits are the commitment option. Every square of the design receives a drill, so no printed background is left showing. The adhesive canvas is pre-printed with the design and marked with symbols that match a color legend, and you place thousands of individual drills onto the sticky surface with a wax-loaded pen.
Because the whole canvas is covered, adhesive quality matters more than on a partial kit: the canvas has to hold every drill for the life of the piece. Square drills pack edge to edge for a polished, tiled finish, while round drills are easier to pick up and leave tiny gaps. If you are comparing larger, display-sized kits, our guide to premium full drill kits covers what to look for.
Full drill is what we specialize in. Our kits use DMC-coded drills, so a color that runs short can be matched by its code, and each kit ships with a stylus pen, a grooved tray and wax so you can start right away. You can see the whole range in all diamond painting kits.
What Is a Partial Drill Diamond Painting Kit?
Partial drill kits are the "get started today" option. You drill only the areas the designer marked as important, usually faces, hands, key objects or foreground elements. The background stays as printed canvas and gives context around the sparkle.
These kits usually use round drills, and they suit designs with a clear subject: portraits where the face gets drills, landscapes where a focal tree or animal is drilled while the scenery stays printed, and decorative pieces with one strong focal point.
The time saving is the big draw. With far fewer drills to place, a partial kit asks much less of your schedule and your hands, which matters because long sessions of repetitive placement can bring on wrist strain and finger fatigue.
Feature Comparison Table: Full Drill vs Partial Drill at a Glance
| Feature | Full Drill | Partial Drill |
|---|---|---|
| Drills to place | Many thousands; every square gets one | A fraction of that; focal areas only |
| Time to complete | About 15 to 20 hours at 40 x 40 cm; 45+ hours for large formats | Much shorter, often a weekend or two |
| Sparkle and visual impact | Maximum, edge to edge | Moderate, focused on the subject |
| Beginner-friendly | Yes on a small round-drill canvas; large canvases need stamina | Yes, the most forgiving option |
| Drill shape | Round or square | Usually round |
| Hand and wrist strain | Higher over a long project | Lower, with a shorter project |
| Mistakes | Every misplaced drill shows | Printed background hides small slips |
| Finished look | Completely covered mosaic | Mixed media: drills plus printed art |
| Cost per kit | Higher (more drills and materials) | Lower (fewer drills) |

Diamond Painting for Beginners: Which Should You Start With?
If you've never held a drill pen, a partial drill kit is the gentlest entry point. Fewer drills means you finish sooner, and finishing something builds momentum and confidence.
Partial drills also forgive mistakes. A drill placed slightly off-center disappears against the printed background, while on a full drill every misplaced drill is visible. That tolerance makes partial kits genuinely less stressful for a first project.
You can still start with full coverage if the all-over sparkle is why you want to try the hobby. Pick a small canvas with round drills: our 40 x 40 cm round-drill kits, such as the Lovebirds kit, take roughly 15 to 20 hours and make a reasonable first project. Our Budget & Beginner Kits collection is a good place to start, and our beginner's guide to diamond painting covers everything else you need before your first canvas.
Watch out: The most common beginner mistake is underestimating a full drill kit. A 45 x 45 cm canvas is roughly 25 to 30 hours of placing, which is three or four weeks of evenings for most people. Plan for that before you start.
Round vs Square Drills: How They Affect Your Choice
Round drills are slightly easier to pick up and place, because the rounded shape doesn't catch on the pen tip. They leave small gaps between drills, which gives a softer, more scattered sparkle, and they are more forgiving when a row isn't perfectly straight.
Square drills pack edge to edge with almost no gaps, for a seamless, tiled finish and sharper detail. They demand more precision: a drill set crooked shows immediately, so you straighten rows as you go. Many experienced diamond painters prefer square drills for full coverage.

For partial drill kits the choice matters less. Round drills are standard, and the printed background softens any gaps. If you have hand dexterity concerns, arthritis or tremors, round drills are the practical choice on a full drill kit too. If you notice gaps or uneven rows on a finished canvas, our guide on how to fix gaps in a diamond painting walks through the fixes.
We carry both shapes. Most of our kits use round drills, and our square-drill kits include the 40 x 50 cm Italian Lakeside Village and a large 60 x 80 cm owl kit for experienced painters.
Time Commitment and Difficulty: Full Drill vs Partial Drill
Full drill kits are not inherently difficult, but they are relentless: you repeat the same motion thousands of times. Drill count scales with canvas area, so a canvas twice as wide and twice as tall holds about four times the drills and takes about four times as long.
These are the placing times we estimate for our own full drill kits, by canvas size:
- 40 x 40 cm: roughly 15 to 20 hours
- 40 x 50 cm (square drills): roughly 20 to 25 hours
- 45 x 45 cm (18 x 18 in): roughly 25 to 30 hours
- 45 x 60 cm: roughly 30 to 35 hours
- 90 x 50 cm (about 35 x 20 in): roughly 45 to 55 hours
- 60 x 80 cm (square drills): roughly 45 to 60 hours
Your own pace will vary with the design. Dark or pale areas where several shades look alike, and busy sections with short color runs, go slower than long single-color backgrounds.
Partial drill kits compress the work into a much shorter project. That makes a real difference if your hands tire quickly or you live with arthritis.
Key takeaway: The real difficulty in diamond painting isn't the technique. It's staying focused and comfortable for hours. Partial drills remove most of that barrier, and full drills reward people who genuinely enjoy the repetition.
How to Complete a Full Drill Canvas, Step by Step
The same routine works for both kit types. On a partial kit, you simply stop at the edges of the drilled areas.
- Set up a flat, well-lit workspace. Lay the canvas on a table you can leave set up, with the pen, tray and wax within reach. Good light matters because shades in one color family can look nearly identical under a warm lamp, so work by symbol rather than by eye. If the canvas arrived with creases, flatten them first with our guide on how to fix a creased diamond canvas.
- Organize your drills. Pour one color at a time into the grooved tray and keep the other packets sealed until their turn, so similar shades never get mixed. Kits with many colors are easier with a sorted container; see how to organize diamond painting drills.
- Uncover one section at a time. Peel back the protective film only over the area you are working on. Once dust or pet hair gets into the adhesive, it's hard to remove without damaging the canvas.
- Load the pen correctly. Press the tip lightly into the wax so it grips a single drill. Too much wax and drills stick awkwardly; too little and they fall off. Refresh the wax when pickup starts to feel unreliable.
- Pick a working order. Either finish one color across the whole section, which cuts down on switching, or work row by row. Dividing the canvas into four to six sections gives you natural stopping points.
- Place gently and check your rows. A light press is enough. With square drills, straighten any crooked drill before moving on; a ruler or drill straightener, like our 3-piece alignment tool set, makes this quicker.
- Take breaks before your hands hurt. Stand up, stretch and rest your eyes every 30 to 45 minutes to help prevent strain.

For a closer look at pens, trays and other helpers, see our roundup of the best tools for diamond painting artists.
Finishing Your Work: Sealing, Framing and Storage
Sealing locks drills in place so they don't lift or pop off over time. The common options are a brush-on or spray sealer applied in thin, even coats, or a layer of clear resin for the hardest finish. You can skip sealing if the piece goes under glass, since the glass protects the surface. For a full drill piece that will hang uncovered, sealing is well worth the effort; for a partial drill piece it's optional but recommended if you want it to last. Our step-by-step guide on how to seal diamond paintings compares the methods, and if drills are already lifting, read why diamond painting drills pop first.
A frame with glass or acrylic keeps dust off, and a shadow box shows off the dimension of a full drill piece; see how to frame diamond painting artwork. If a finished piece isn't going on the wall yet, store it flat, never rolled, in a cool, dry place out of direct sunlight, as our guide on how to store diamond painting kits explains.
Pros and Cons: Full Drill Kits
Pros: Full drill kits deliver maximum visual impact. The sparkle is dramatic, the finished piece commands attention in any room, and the whole design is rendered in drills. Many crafters also love the meditative rhythm of a long project.
Cons: The time commitment is real and often underestimated. Hand and wrist strain builds over a long project, the cost per kit is higher, and mistakes are more visible because the entire surface is drills.
Pros and Cons: Partial Drill Kits
Pros: Partial drills are achievable in a short timeframe. The combination of drills and printed artwork creates an appealing mixed-media effect, hand strain is minimal, and the kits cost less.
Cons: Partial drills lack edge-to-edge sparkle, and some crafters feel the result looks unfinished. Because the printed background stays visible, the finished piece also depends on print quality.
Which One Should You Choose?
Start with one question: do you want a statement piece that catches light from across the room, or a relaxing project you can finish without hand fatigue? Then check three practical points:
- Your time. If you have only a few hours a week, a partial drill or a small full drill canvas will reach the wall sooner. If you have 10 or more hours a week and enjoy repetitive work, a large full drill is realistic.
- Your hands. If you have arthritis, chronic pain or hands that tire easily, choose a partial drill or a small round-drill full drill kit and work in short sessions.
- The look you want. If sparkle is the reason you're drawn to diamond painting, full drill is worth the hours. If you like printed art with selective sparkle, partial drill delivers that beautifully.
Many crafters start small, confirm they love the hobby, then commit to a bigger canvas. There's no wrong answer: the best kit is the one you'll actually finish and display proudly. When you're ready to go big, our Full-Size Kits and Premium Large-Format Kits are made for the wall.
Frequently Asked Questions
Are full drill diamond painting kits more expensive than partial drill kits?
Usually, yes. Full drill kits contain far more drills and need adhesive across the whole canvas, so they cost more than a partial kit of the same size. Price also depends on canvas size and design complexity, so compare kits of similar dimensions.
What does "5D" mean in full drill diamond painting?
"5D" is a marketing label rather than a technical standard. It usually refers to the faceted top of each drill, which reflects light from several angles and gives a finished canvas its sparkle. Most kits today use faceted drills, so drill shape, color accuracy and canvas quality tell you more than the label when you compare kits.
Can you seal a partial drill painting the same way as a full drill?
Yes, with one caution. On a partial drill piece the sealer also covers the printed background, and some sealers can darken the print or change its sheen. Test on a corner or the canvas margin first, then apply thin, even coats in a well-ventilated area.
Shop the Kits in This Guide
Browse all diamond painting kits, start small with our Budget & Beginner Kits, or go bigger with Full-Size Kits and Premium Large-Format Kits. Drill pens, trays, organizers and alignment tools are in Tools & Accessories, and we also 3D-print tools and decor in our studio. Shipping within the US is $5.95 on orders under $20, $8.95 from $20 to $99.99, and free on orders of $100 or more.


