14 August 2026
How to Fix Gaps in Diamond Painting
Table of Contents
- Why Gaps Appear in Diamond Painting
- How to Fix Gaps in Diamond Painting: The Checkerboard Method
- Using a Diamond Painting Straightening Tool
- How to Keep Diamond Painting Lines Straight
- Fixing Misaligned Drills and Drill Drift
- Adhesive Quality and Gap Prevention
- Common Mistakes to Avoid
- Long-Term Preservation of Your Finished Work
Last Updated: August 15, 2026
Why Gaps Appear in Diamond Painting
Gaps result from uneven pressure during application, weakened adhesive, or drills that shift after placement. Lower-quality canvases have weaker adhesive coatings that deteriorate faster, especially in warm environments. Premium kits use higher-grade adhesive formulations that maintain their grip longer.
Round drills shift more easily than square drills because they have less surface contact with the adhesive. Even a slight tilt during application creates gaps that become noticeable once surrounding drills are placed. Square drills sit flush against neighbors when aligned correctly, reducing visible spacing issues.
Working in inconsistent environmental conditions accelerates gap formation. Temperature fluctuations cause canvas adhesive to expand and contract, loosening the grip on diamonds. Humidity also affects adhesive performance, too much moisture softens it, while dry conditions make it brittle. This is why professionals work in controlled spaces and why protective storage matters for finished pieces.
How to Fix Gaps in Diamond Painting: The Checkerboard Method
The checkerboard method forces you to assess spacing patterns systematically. Instead of filling gaps randomly, you work through the canvas in a deliberate pattern that makes misalignment obvious and easier to correct.
Step 1: Assess Your Gap Pattern
Step back and identify where gaps cluster most heavily. Are they concentrated in certain rows or scattered throughout? Do they appear more frequently with round or square drills? If gaps appear primarily along section edges, you have a pressure inconsistency issue. If gaps are random, the adhesive may be losing grip. If gaps appear only with round drills while square drills sit flush, you've identified a drill-type-specific problem.
Examine gaps under good lighting. Some are actual spacing issues where drills shifted or weren't seated properly. Others are optical illusions created by slight color variations or light angles. Only address actual gaps where you can see daylight between the drill and its neighbors.
Step 2: Apply the Checkerboard Spacing Technique
Begin in one corner and work in a checkerboard pattern, addressing every other gap as you move across and down. This prevents accidentally creating new gaps while fixing existing ones and distributes pressure evenly.
For each gap, use your stylus to gently lift the misaligned drill slightly. Press it back down firmly, holding pressure for 2-3 seconds. If the adhesive feels weak when you lift the drill, the canvas adhesive has degraded. Move to the heat-based adhesive reset technique instead, continuing to press weak adhesive drills won't solve the problem.
Step 3: Check Your Progress
After completing the checkerboard pass, reassess. You should see improvement in at least 60-70% of targeted gaps. If gaps remain stubbornly in place despite firm pressure, the adhesive is likely the limiting factor, not your technique.
Take a photo for reference. Gaps that return within hours indicate adhesive failure rather than placement error.
Using a Diamond Painting Straightening Tool
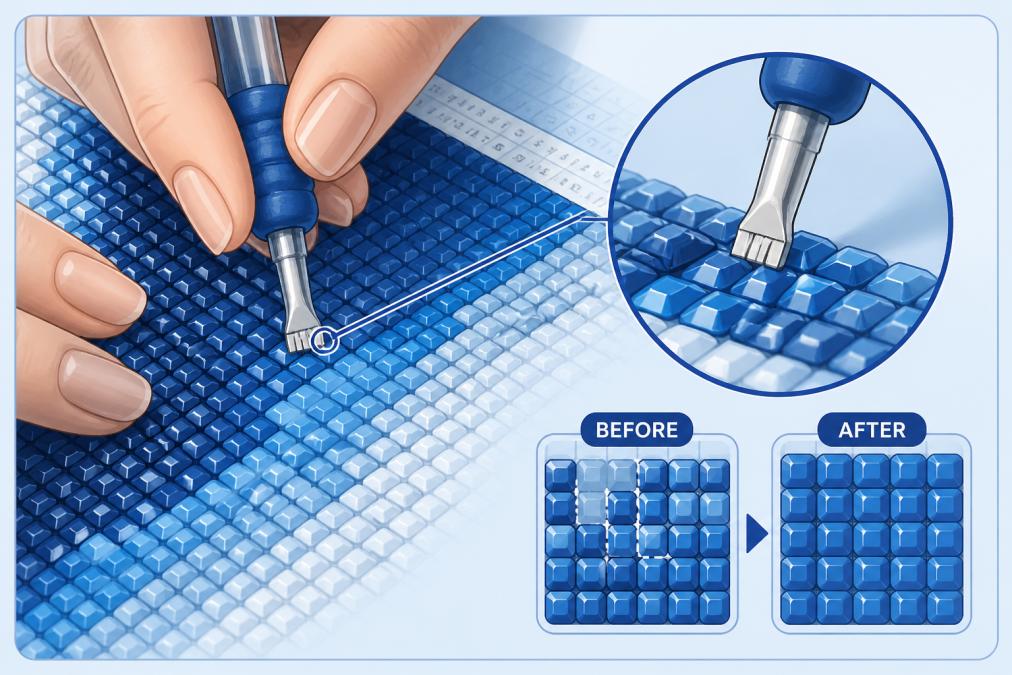
A diamond painting straightening tool realigns drills without removing them from the canvas. These devices apply gentle pressure to shift misaligned drills back into proper position with surrounding drills.
Selecting the Right Tool for Your Drill Type
Round drill straighteners typically have a rounded tip that grips and rolls a round drill into alignment. Square drill tools usually have a flat or slightly squared edge that applies pressure across the drill face.
For square drills, a flat-faced straightening tool gives the most control, distributing pressure evenly across the drill face. For round drills, a slightly rounded or tapered tip applies pressure to the drill's side without excessive force.
Quality tools incorporate ergonomic handles that reduce hand strain during detailed work.
Straightening Technique for Precision
Position the straightening tool at a 30-45 degree angle to the misaligned drill, not perpendicular. This angle lets you apply rolling pressure that nudges the drill into alignment rather than dislodging it.
Apply steady, moderate pressure for 2-3 seconds, then release. Multiple gentle applications work better than one aggressive push. Work from the outer edge of the misaligned drill toward the center of the gap, using surrounding drills as a natural guide.
How to Keep Diamond Painting Lines Straight
Maintaining straight lines throughout your project prevents most gaps from forming. The key is working systematically and using visual guides to keep rows aligned as you progress.
Working in Small Sections for Control
Work in small sections, roughly 4-6 inches square, to maintain consistent pressure and alignment. When working across large areas, subtle hand position shifts compound into visible gaps.
Complete one section fully before moving to the next. Within each section, work row by row rather than filling randomly. Rows provide natural progression and make it obvious when a drill is misaligned.
Using a Straight Edge and Grid Reference
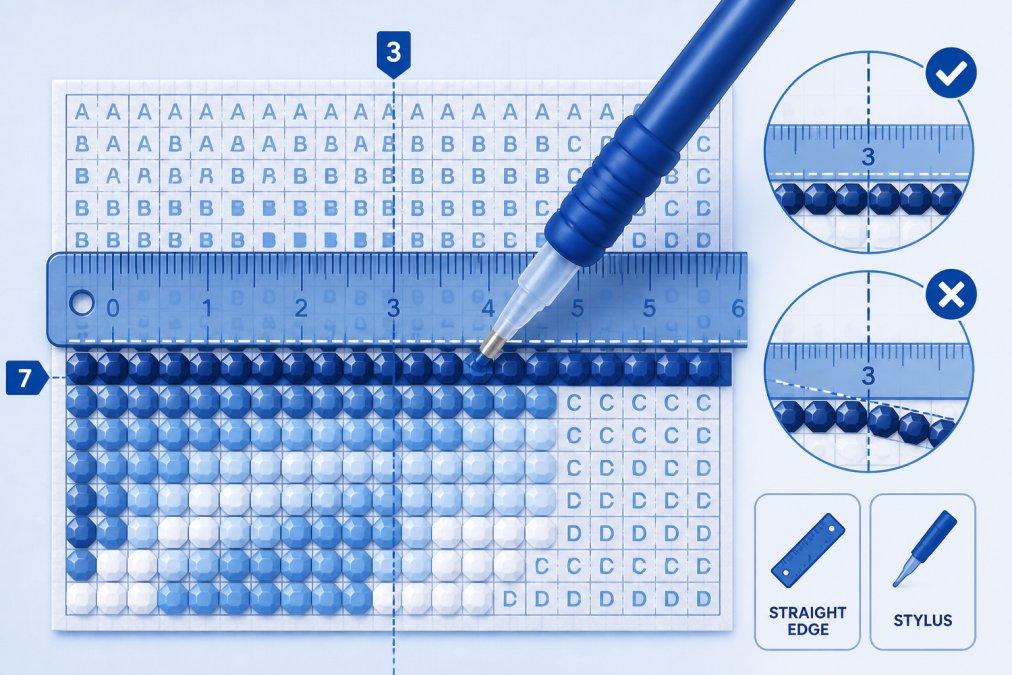
Place a straight edge just above the row you're working on as a visual guide. Your eye will naturally align new drills with this reference line, keeping them in a straight row.
If your canvas has printed grid lines, use them actively. Align each drill with the grid, not just with adjacent drills. If your canvas lacks grid lines, align your first row perfectly, then use it as your visual guide for subsequent rows.
Fixing Misaligned Drills and Drill Drift
Misaligned drills cause visible gaps and disrupt visual flow. Drill drift, where drills gradually shift out of position, creates gaps that seem to appear on their own after completion.
Adjusting Drills with Your Stylus
Use the flat end of your stylus for realignment work. Position it against the side of the misaligned drill, not the top. Side pressure lets you roll or slide the drill into proper alignment without pressing it deeper or popping it off.
Press gently and hold for 2-3 seconds. The adhesive needs time to reset around the drill's new position. Releasing too quickly means the drill will drift back.
Round vs. Square Drill Gap Solutions
Round drills don't have flat sides to align against neighbors, so gaps between them are more forgiving visually. Focus on spacing consistency rather than perfect alignment. If all round drills are spaced evenly, the eye perceives them as aligned.
Square drills should sit flush against neighbors with no gaps. Square drill gaps are immediately obvious because drills should form a seamless grid. Aim for zero spacing between adjacent drills. Weak adhesive is often the culprit if square drills drift despite correct application. Premium kits with superior adhesive formulations deliver better long-term results.
Adhesive Quality and Gap Prevention
Canvas adhesive is the foundation of your project. Poor adhesive quality guarantees gaps, regardless of technique. Understanding adhesive behavior helps prevent gaps before they start.
Using Heat to Soften and Reset Adhesive
When adhesive weakens, applying gentle heat can temporarily soften it, allowing you to reset drill positions. Use a hairdryer on the lowest heat setting, holding it 6-8 inches from the canvas. Move it slowly across the problem area for 10-15 seconds.
After warming, immediately press loose drills back into position. The softened adhesive will grip more firmly as it cools. This technique works best on smaller problem areas. Test your hairdryer on a small inconspicuous area first.
Preventative Techniques for Square Drills
Store finished and in-progress canvases flat, not rolled or folded. Keep your workspace at consistent temperature, avoiding heating vents, air conditioning units, or windows where temperature fluctuates.
Cover the canvas with acid-free tissue paper when not actively working on it. This protects adhesive from dust and reduces air exposure. Don't use plastic wrap, which traps moisture and softens adhesive unevenly.
Handle the canvas by its edges, not the face. Oils from your hands degrade adhesive over time. Wash your hands before each session.
Common Mistakes to Avoid
The most common mistake is applying inconsistent pressure while placing drills. Develop a consistent pressure routine and stick to it throughout your session.
Working when fatigued causes inconsistent pressure and missed alignment cues. Take a 15-minute break after 90 minutes of work. Your hands reset and your eyes refocus.
Many crafters ignore adhesive quality until gaps appear. Choose premium kits with verified adhesive performance from the start. Working in poor lighting prevents you from seeing gaps clearly or judging alignment properly. Use a bright LED lamp positioned to illuminate the canvas without glare.
Finally, don't rush the straightening process. Methodical work using the checkerboard technique yields better results than frantic attempts to fix everything at once.
| Common Mistake | Why It Causes Gaps | Prevention Strategy |
|---|---|---|
| Inconsistent pressure | Drills sit at different depths in adhesive | Develop routine pressure and maintain it |
| Poor lighting | Can't see alignment or gaps clearly | Use bright LED lamp without glare |
| Working while fatigued | Hands lose precision and consistency | Take 15-minute breaks every 90 minutes |
| Ignoring adhesive quality | Weak adhesive can't hold drills | Start with premium kits designed for durability |
| Rushing straightening work | Drills reset improperly and drift back | Use checkerboard method and hold pressure 2-3 seconds |
Long-Term Preservation of Your Finished Work
Once you've fixed gaps and completed your diamond painting, proper preservation ensures your work stays gap-free for years.
Store finished pieces flat in a cool, dry place. Avoid basements or attics where temperature and humidity fluctuate dramatically. Frame your finished pieces under glass or acrylic to protect them from dust and handling. Allow a small air gap so the frame doesn't press directly on the canvas.
Avoid high-traffic areas where vibration could cause drills to shift. Clean the surface only with a soft, dry cloth, never use water or cleaning solutions, as moisture softens adhesive and causes drills to pop off.
Avoid direct sunlight, which fades both canvas design and drill colors. Position your display away from windows or use UV-protective glass if near natural light.
Gaps in diamond painting are frustrating but fixable with the right technique and tools. Whether addressing existing gaps using the checkerboard method or preventing them through careful technique and proper adhesive, consistent pressure, proper alignment, and quality materials make the difference. When you invest in quality from the start, you spend less time fixing gaps and more time enjoying the creative satisfaction of a flawless finished piece.
Frequently Asked Questions
Why do gaps appear in diamond painting?
Gaps occur due to several factors: uneven pressure when applying drills, inconsistent canvas adhesive quality, drill drift during application, and spacing errors when placing drills in rows. Square drills are more prone to gaps than round drills because they require precise alignment. Poor adhesive causes drills to shift after placement, creating visible spaces between gems. Working too quickly or applying drills at inconsistent angles also contributes to misalignment.
What is the best tool for straightening diamond painting drills?
A diamond painting straightening tool (also called a precision straightener or alignment tool) is purpose-built for this task. These tools have a small channel or groove that guides drills into proper alignment without damaging them. Tweezers work for minor adjustments, but a dedicated straightening tool provides better control and consistency. Choose a tool designed for your drill type: square drills need different straighteners than round drills due to their different edge geometry.
How do you keep lines straight in diamond painting?
Use the checkerboard method: place drills in alternating rows to establish a grid pattern, which helps you visualize spacing before filling gaps. Work in small sections to maintain control and precision. Use a straight edge or ruler as a visual reference guide for each row. Apply consistent pressure with your stylus to prevent drill drift. Pause between sections to assess alignment and make micro-adjustments before the adhesive fully sets.
Can you fix gaps after the adhesive has dried completely?
Yes, but it's more challenging. Use a hairdryer on low heat to gently warm the canvas and soften the adhesive around gaps. This allows you to reposition existing drills or insert replacement drills. Work carefully to avoid overheating, which can damage the canvas or wax backing. For permanent fixes, remove misaligned drills with tweezers, clean the spot, and apply a fresh drill with a small amount of wax if needed. Prevention during initial application is always easier than correction.
This article was written using GrandRanker