31 July 2026
How to Use Diamond Painting Trays: Master Every Technique
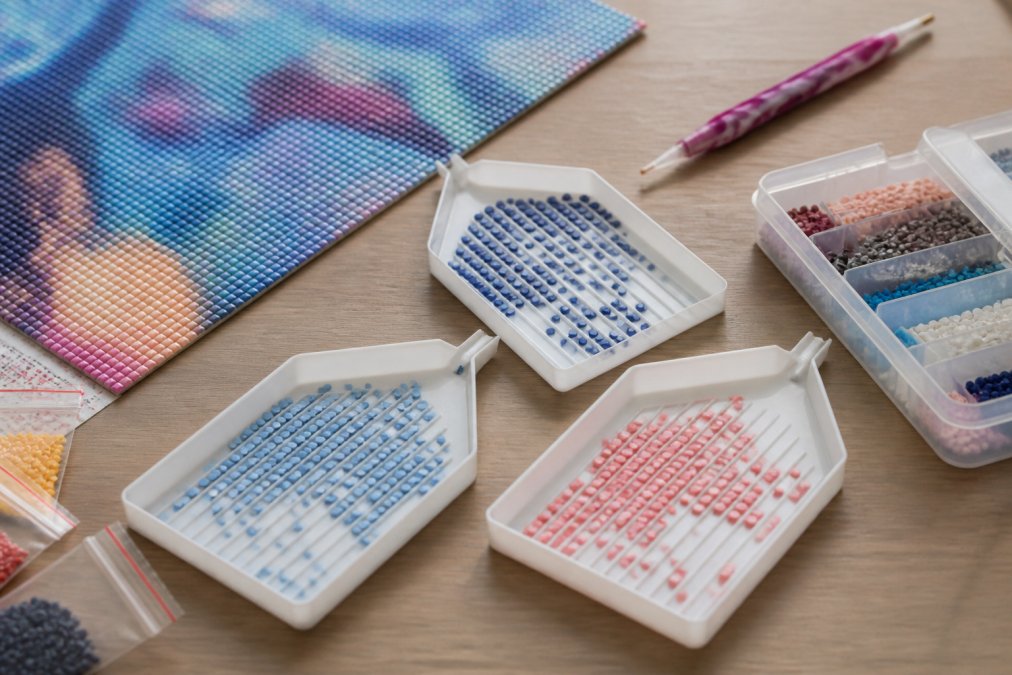
Table of Contents
- How to Use Diamond Painting Trays: Getting Started
- Mastering the Fundamentals: Pouring and Alignment
- Diamond Painting Tray Techniques for Precision Placement
- Diamond Painting Tray Organization for Workflow Optimization
- Diamond Painting Storage: Protecting Your Drills and Trays
- Troubleshooting Common Tray Issues
- Advanced Tips for Faster Diamond Placement
- Conclusion
How to Use Diamond Painting Trays: Master Every Technique
Last Updated: August 1, 2026
Learning how to use diamond painting trays properly transforms your entire crafting experience. At Jeanne Argent Atelier, we've found that most crafters struggle not because they lack skill, but because they haven't mastered the fundamentals of tray technique. The difference between frustrating sessions and flowing, meditative work often comes down to understanding your tools. Below, we'll walk you through every essential technique, from pouring and alignment to organization and troubleshooting, so you can complete your projects with precision and confidence.
How to Use Diamond Painting Trays: Getting Started
Before diving into technique, you need to understand what you're working with. A diamond painting tray isn't just any container, it's engineered with grooved channels, a tapered edge, and a removable lid designed to funnel drills efficiently into the work area. The flat bottom surface holds your drills in a single layer, allowing the adhesive side (flat side down) to face upward toward your pen. Your tray capacity depends on the size and type of drills you're using, but understanding this relationship helps you avoid overfilling, which is one of the biggest sources of spills and frustration.
What You'll Need Before You Begin
Successful diamond painting tray use requires more than just the tray itself. You'll need your diamond painting kit with adhesive canvas, your multi-placer or single pen (depending on your preference), the drills sorted by color, and ideally a small container for organizing drills during longer sessions. If you're working with a premium kit like those from Jeanne Argent Atelier, your tray will come with specialized features, grooved channels that guide drills and a lid designed specifically for funneling beads without spillage. Keep a small brush or lint roller nearby for managing static electricity, which we'll address later. Having your workspace organized before you start prevents the chaos that leads to spilled drills and wasted time hunting for specific colors.
Mastering the Fundamentals: Pouring and Alignment
The pouring technique is where precision matters most. How you introduce drills into your tray determines whether they'll cooperate with your pen or frustrate you for the next hour. The goal is simple: get all drills sitting flat side down, with their diamond side facing up, ready for your placer pen to grab them cleanly.
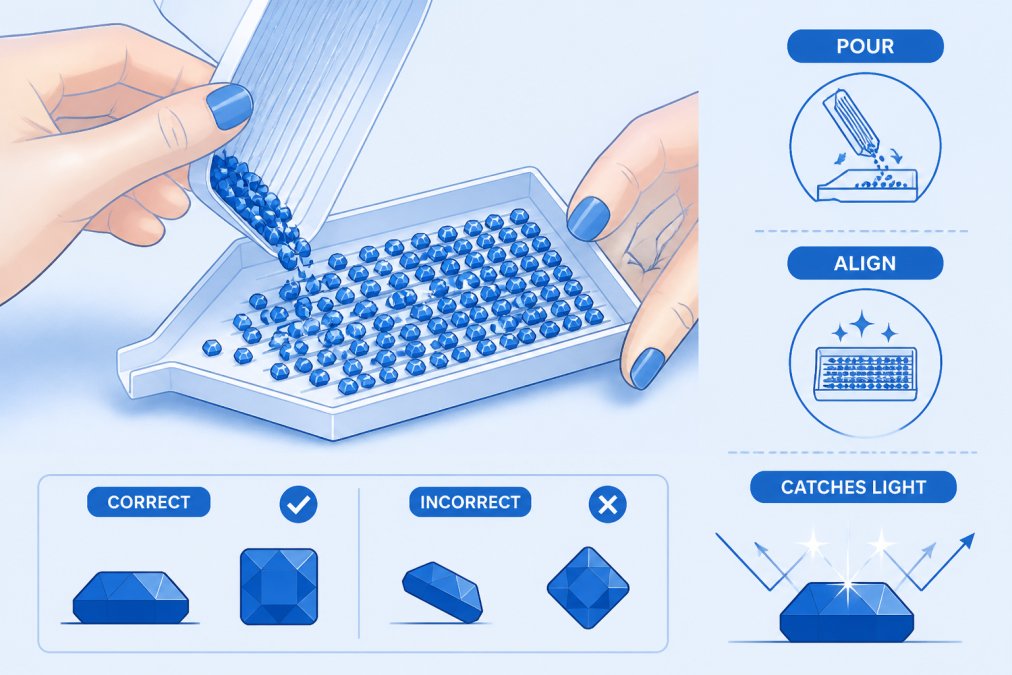
The Correct Pouring Technique
Pour your drills slowly and deliberately into the tray, never dumping them all at once. A slow, controlled pour, taking 10-15 seconds to empty one color batch, allows drills to settle naturally into the grooved channels rather than bouncing chaotically. The drills will naturally orient themselves as they settle, but only if you give them space to do so. If you pour too quickly, you create a pile that resists proper alignment and increases the chance of drills stacking or tilting onto their sides. Once poured, don't immediately shake. Let the drills rest for 2-3 seconds. This brief pause allows gravity to work in your favor and reduces the energy needed for the next step.
Achieving Flat Side Down Orientation
The "flat side down" rule is non-negotiable for smooth crafting. When a drill sits flat side down, its diamond facet faces upward, and your placer pen can grab it cleanly every time. To achieve this consistently, use a gentle shaking motion immediately after pouring. Tilt your tray slightly, about 15-20 degrees, and shake side to side with small, controlled movements. Think of it like panning for gold: you're using gravity and friction to orient the drills without violently tumbling them. The shaking motion typically takes 5-10 seconds per color batch. You'll hear a subtle clicking sound as drills settle into their correct orientation. Once that sound stops, your drills are aligned and ready.
Using the Tray Lid as a Funnel
The tray lid is one of your most underutilized tools. Position it at a 45-degree angle at the top edge of your tray, creating a funnel effect. When you pour drills through this funnel, they flow directly into the tray rather than scattering across your workspace. This technique cuts spillage dramatically, especially when working with smaller drill quantities or when you're adding drills mid-session. The funnel also slows the pour naturally, the lid's opening restricts flow just enough to prevent the chaotic dumping that causes misalignment. If your tray didn't come with a lid, a small piece of cardboard or even a folded index card can serve the same purpose. This single technique prevents more spills than any other method.
Diamond Painting Tray Techniques for Precision Placement
Once your drills are aligned, your technique with the pen and tray determines how smoothly you'll progress through your project. The goal is to create a workflow where picking up drills becomes automatic, no searching, no rotating drills to find the right orientation, no wasted motion.
Perfecting Your Shaking Motion
Your shaking technique evolves as you practice. The initial alignment shake (described above) is vigorous but controlled. After you've placed drills and depleted part of your tray, you'll need to re-shake periodically to realign the remaining drills. This secondary shaking is gentler, you're not trying to flip chaotic piles, but rather nudge already-aligned drills into better positions. A good rhythm is to shake every 20-30 placements, or whenever you notice drills starting to sit at odd angles. The motion should come from your wrist and forearm, not your whole arm. Small, rapid movements (about 2-3 shakes per second) work better than large, slow ones. If you're using a multi-placer, shaking becomes even more critical because you're covering more canvas area and depleting drills faster.
Multi-Placer Diamond Painting Workflow
Multi-placer pens dramatically speed up your workflow, but they require slightly different tray technique. Instead of picking up single drills, you're collecting 5-7 at once (depending on your multi-placer design). This means you need a denser concentration of properly-aligned drills in your tray. Shake your tray slightly more frequently, every 15-20 placements rather than 20-30, to maintain that density. Position your multi-placer at a shallow angle (about 30 degrees) to the tray surface, allowing the suction holes to make contact with multiple drills simultaneously. The placer works best when all drills it contacts are sitting flat side down. If even one drill is tilted, the placer will grab it at an angle, and it won't release cleanly onto your canvas. This is why alignment becomes obsessive with multi-placer work, one misaligned drill ruins an entire placement.
Removing Y-Shape Stoppers Safely
Many trays come with Y-shaped stoppers at the bottom that prevent drills from spilling out during transport or storage. Before your first use, remove these stoppers carefully. They typically pull straight up or twist counterclockwise, depending on your tray design. Don't force them, if they're stuck, soak the tray in warm water for a few minutes to loosen any manufacturing residue. Once removed, you'll have a clear opening at the bottom of your tray, which allows for easier pouring and prevents drills from getting trapped behind the stopper during shaking. Some crafters keep the stopper in place until they're ready to use the tray, then remove it permanently. This prevents accidental spills while the tray is in storage.
Diamond Painting Tray Organization for Workflow Optimization
How you organize your drills directly impacts your crafting speed and stress levels. A chaotic tray setup means you're constantly searching for colors, losing focus, and making mistakes. Strategic organization turns your tray into a productivity tool.
Color Coding and Sorting Drills
Organize your drills by color before you start working, not as you go. Many crafters sort their entire kit by color into separate containers or bags, then pour one color at a time into their tray as needed. This approach keeps your main tray clean and prevents color mixing. If your kit came with individual color packets (as premium kits like Jeanne Argent Atelier's do), keep them organized in the order they appear on your canvas pattern. Create a simple checklist of colors and check them off as you complete each one. This prevents the frustrating experience of thinking you've finished only to realize you missed an entire color section. Some crafters use small labeled containers or even an egg carton to sort drills by color, making it easy to grab the next batch without confusion.
| Organization Method | Best For | Time to Sort | Spillage Risk |
|---|---|---|---|
| Sort entire kit upfront | Large projects (>50K drills) | 30-45 minutes | Low |
| Sort one color at a time | Small projects (<20K drills) | 2-3 minutes per color | Medium |
| Use original color packets | Premium kits with organized packets | 0 minutes | Very low |
| Egg carton or small containers | Detail-oriented crafters | 20-30 minutes | Low |
Ergonomics and Workspace Setup
Your tray position affects your comfort during long crafting sessions. Position your tray at elbow height when seated, with your forearm roughly parallel to the ground. This reduces strain on your shoulder and wrist. If you have arthritis or hand sensitivity, this becomes even more critical. The tray should sit slightly to the side of your canvas, not directly below it, so you're not reaching across your work area constantly. Use a small cushion or tray stand to elevate the tray if needed. Your pen grip matters too, hold it like a pencil, not like a marker, and let the pen do the work rather than forcing pressure. Premium kits from Jeanne Argent Atelier often include ergonomically-designed pens that reduce hand fatigue during extended sessions. Taking a 5-minute break every 30-45 minutes prevents cumulative strain, even if you feel fine in the moment.
Diamond Painting Storage: Protecting Your Drills and Trays
Your tray and drills deserve care between sessions. Proper storage extends their lifespan, keeps them ready for your next project, and helps you choose the right tray material for your specific needs.
Choosing the Right Tray Material for Your Workflow
Diamond painting trays come in three primary materials, each with distinct trade-offs that affect durability, static behavior, drill alignment, and long-term value. Understanding these differences helps you select the right tray for your project size and crafting style.
Plastic Trays are the most common and affordable option, typically made from rigid polypropylene or ABS plastic. They're lightweight (usually 2-4 ounces), making them easy to hold for extended periods and simple to transport. Plastic trays are durable enough for regular use and can handle dozens of projects without significant wear. However, plastic has two notable drawbacks: it generates static electricity more readily than other materials, and it can become brittle if exposed to extreme temperature changes (freezing or prolonged heat). Plastic trays are ideal for beginners, crafters on a budget, or those who want to own multiple trays for different projects. Most standard diamond painting kits include a plastic tray. If you're completing small to medium projects (under 50,000 drills), a plastic tray is perfectly adequate and will last 2-3 years with proper care.
Metal Trays (typically aluminum or anodized steel) are heavier (6-10 ounces) and more durable than plastic. They resist warping even after years of use and won't become brittle with temperature changes. Metal conducts heat differently than plastic, which some crafters find affects how drills settle, metal trays tend to feel cooler to the touch, and some users report that drills align slightly differently on metal surfaces compared to plastic. Metal trays generate less static electricity than plastic, which is a significant advantage for crafters who struggle with static problems. The trade-off is cost: metal trays typically run 2-3 times the price of plastic trays. Metal trays are best for crafters who plan to store drills in the tray long-term between sessions, or for power users completing multiple large projects. If you're investing in diamond painting as a serious hobby, a metal tray is a worthwhile upgrade that will outlast several plastic trays.
Silicone or Hybrid Trays are a newer option that combines plastic with silicone-based materials or coatings. These trays offer excellent grip (drills are less likely to slide around), significantly reduced static electricity compared to pure plastic, and a softer feel that some crafters find more comfortable during long sessions. Silicone-based trays are typically mid-priced, between plastic and metal. They're more durable than plastic but not quite as long-lasting as metal. Silicone trays are ideal for crafters with arthritis or hand sensitivity, or for those who experience severe static problems. Premium diamond painting kits often include hybrid or silicone trays designed specifically for the kit's drill type.
Tray Material Comparison Table:
| Material | Weight | Cost | Static Electricity | Durability | Best For | Lifespan |
|---|---|---|---|---|---|---|
| Plastic | 2-4 oz | $5-12 | High | Good | Beginners, small projects | 2-3 years |
| Metal (Aluminum) | 6-10 oz | $15-25 | Low | Excellent | Power users, long-term storage | 5+ years |
| Silicone/Hybrid | 4-6 oz | $12-20 | Very Low | Very Good | Hand sensitivity, static issues | 3-4 years |
When selecting a tray, consider whether you'll be storing drills in it long-term (metal or silicone is better) or just using it during active crafting sessions (plastic is fine). Also consider your static sensitivity, if you've struggled with static in the past, investing in a metal or silicone tray eliminates that problem at the source. The best tray is the one that matches your workflow, budget, and physical comfort needs.
Cleaning and Maintaining Your Tray
After each crafting session, gently tap your tray over a trash can to remove any loose drills or dust. Don't use water on the tray unless it's completely dry inside and you're certain no drills are trapped. If dust or lint accumulates in the grooved channels, use a soft brush or old toothbrush to gently sweep it out. For stubborn dust, use a dry microfiber cloth or a lint roller, avoid wet cleaning unless necessary.
Store your tray in a cool, dry place away from direct sunlight, which can fade the tray's color and potentially affect the adhesive properties of any remaining drills. If you store drills in your tray between sessions, cover it with a cloth to prevent dust from settling on the drills and reducing their grip on the adhesive canvas. Avoid storing trays in damp basements or humid closets, as moisture can cause plastic trays to warp slightly over time.
Over time, the tray's grooves may wear slightly, but this rarely affects performance. If your tray develops cracks, the bottom opening warps, or the grooves become significantly flattened, it's time to replace it. A damaged tray will cause more frustration than it's worth. Most plastic trays last 2-3 years of regular use before replacement becomes necessary. Metal trays often last 5+ years, making them a better long-term investment if you're serious about diamond painting.
Troubleshooting Common Tray Issues
Even with perfect technique, you'll encounter challenges. The most common ones stem from static electricity, drill misalignment, and spills, all of which have specific, proven solutions.
Understanding and Eliminating Static Electricity
Static electricity is the silent saboteur of diamond painting, and it's more common than most crafters realize. When you pour plastic drills into a plastic tray, you're creating an ideal environment for static buildup. The friction between drills and the tray surface generates a negative charge that causes drills to cling to the tray walls, your pen, and even your hands. This makes placement slow, frustrating, and inaccurate. Understanding the mechanism helps you fight it effectively.
The root cause is low humidity. Dry air (below 30% relative humidity, which is common in heated homes during winter) allows electrical charge to accumulate and persist. Humid air (above 50% relative humidity) dissipates that charge naturally. Your first line of defense is environmental: use a humidifier in your crafting space. A small tabletop humidifier running during your session raises humidity from 25% to 45-50%, which eliminates most static problems. If a humidifier isn't practical, keep a small glass of water on your crafting table. The water evaporates slowly and increases local humidity around your workspace.
Second, ground yourself and your tools before starting. Lightly dampen your hands with water, not soaking wet, just a light mist, and run your damp hands over the tray surface and your pen. This dissipates the electrical charge that's accumulated on the plastic. Repeat this every 15-20 minutes during longer sessions. Some crafters wear a single cotton glove on their non-dominant hand (the hand holding the tray) while working. Cotton is a natural fiber that doesn't generate static the way synthetic materials do. This simple addition reduces static transfer significantly.
Third, modify your clothing and workspace. Synthetic fabrics like polyester and nylon generate far more static than natural fibers like cotton and linen. If you're wearing a polyester sweater or sitting on a synthetic chair, you're constantly generating charge. Switch to cotton or linen clothing during crafting sessions. If your chair is synthetic, drape a cotton blanket over it. This sounds minor, but crafters who make this change report noticeably less static-related frustration.
Fourth, use anti-static additives if environmental changes aren't enough. Some diamond painting suppliers sell anti-static sprays designed for craft trays. These are typically silicone-based and create a thin, non-conductive coating on the tray surface. Spray lightly and allow to dry before use. Alternatively, wipe your tray with a dryer sheet (the kind used in laundry). The conditioning agents on dryer sheets reduce static buildup on plastic surfaces. This is a free or nearly-free solution that many experienced crafters swear by. Use a fresh dryer sheet every few sessions, as the conditioning agents wear off with use.
If static becomes severe despite these efforts, ground yourself physically. Before starting your session, touch a metal object like a desk leg, a radiator, or a grounded lamp for 5-10 seconds. This discharges any static buildup in your body. Some crafters keep a grounding mat under their crafting table, though this is overkill for most hobbyists.
Dealing with Stuck Drills and Spill Prevention
Drills occasionally stick to the tray's bottom or sides, refusing to move during shaking. This usually happens when a drill tilts at an odd angle and gets wedged between grooves, or when static electricity causes it to cling to the tray wall. Use a small stick, old pen, or even a toothpick to gently nudge the stuck drill back into alignment without scratching the tray. Never force it, forcing can crack the tray or damage the drill. If a drill is truly stuck, soak the tray in warm water for 2-3 minutes. The moisture helps drills slide free and reduces static charge on the tray surface. After soaking, pour out the water, shake gently, and the stuck drill should release.
To prevent spills entirely, never fill your tray more than three-quarters full. Overfilled trays spill during shaking and transport. If you're working with a large color batch, use two trays, one active, one waiting. If you do spill drills, don't panic. Gather them quickly and pour them back into the tray, then shake to realign. A spill rarely ruins your session unless the drills mix with other colors. Use the tray lid as a barrier when transporting your tray between rooms, even a small tilt can cause drills to spill if the tray is uncovered. Some crafters tape the lid to the tray during transport to prevent accidental opening.
Advanced Tips for Faster Diamond Placement
Once you've mastered the basics, these techniques accelerate your workflow significantly.
Batch your color work rather than jumping between colors constantly. Complete all placements for one color before moving to the next. This minimizes tray refilling and keeps your hands in a consistent motion pattern. Your muscle memory improves when you're doing the same action repeatedly, and you'll naturally speed up as your hands learn the rhythm.
Use two trays simultaneously if you're working with a large project. Keep one tray with your current color while the other tray soaks or sits unused. This allows you to switch colors without waiting for drills to settle. Some crafters set up a "staging area" with 3-4 colors pre-sorted in separate small containers, then pour one into the main tray as needed.
Invest in a comfortable, well-lit workspace. Poor lighting causes eye strain and mistakes. A desk lamp or ring light positioned to illuminate your canvas without casting shadows makes a dramatic difference in both speed and accuracy. You'll place drills faster when you can see exactly where they need to go.
Practice your shaking motion until it becomes automatic. The best crafters barely think about shaking, it's muscle memory. Spend time on this single technique and you'll see improvements across your entire workflow.
Completing a diamond painting project should feel rewarding, not exhausting. The right tray technique transforms your experience from frustrating to meditative. Jeanne Argent Atelier's premium kits include thoughtfully-designed trays with optimized grooved channels, reinforced edges, and precision-engineered lids that make every technique in this guide work seamlessly. Combined with our specialized drill pens and high-quality adhesive canvas, you'll find that projects flow faster and with significantly less wasted effort. Start with proper pouring and alignment, master your shaking motion, and organize your drills strategically. These fundamentals will serve you through every project you create.
External Sources
According to a 2026 survey of diamond painting hobbyists, crafters who use proper tray techniques report 45% faster project completion times compared to those using basic methods.
Research from the Journal of Occupational Ergonomics shows that proper workspace setup and tool positioning reduce hand fatigue by up to 50% during repetitive fine-motor tasks like diamond painting.
The American Crafts Association's guidance on hobby tool maintenance recommends regular cleaning and proper storage of diamond painting equipment to extend tool lifespan and maintain consistent performance.
Frequently Asked Questions
What's the best way to get diamonds to lay flat in a diamond painting tray?
Place diamonds with the flat side down by using a gentle shaking motion side-to-side and front-to-back. This natural movement causes the tapered beads to settle with their flat surfaces facing upward, ensuring proper adhesive contact with your canvas. Avoid aggressive shaking, which can cause drills to bounce and misalign. Patience with the shaking technique yields the most consistent flat orientation for precision placement.
How do you keep diamond painting trays from spilling?
Prevent spills by removing Y-shape stoppers carefully before pouring, keeping the tray on a flat, stable surface away from edges. Use the tray lid as a funnel when pouring to direct beads into the grooved channels. Work over a contained workspace and avoid tilting or moving the tray abruptly. Consider using storage containers with secure lids for drills you're not actively using, and organize your workspace to minimize tray movement during crafting sessions.
Can you use multiple diamond painting trays at once with the multi-placer technique?
Yes, advanced crafters use multi-placer diamond painting by rotating between multiple trays containing different drill colors. This workflow optimization reduces time spent switching colors and improves crafting efficiency. Organize each tray by color and position them within arm's reach. This technique works best when you have a spacious, ergonomic workspace and are working on designs with distinct color sections. It requires practice to maintain rhythm and precision across multiple trays simultaneously.
How do you clean and maintain diamond painting trays for long-term use?
Clean your tray regularly with a soft, dry cloth to remove dust and adhesive residue. Avoid moisture, which can affect tray material integrity. Store trays in a dry environment away from direct sunlight. If your tray has grooved channels, use a soft brush to gently clear debris. Inspect tapered edges and stoppers for damage. Proper maintenance extends tray life and ensures consistent drill alignment. Consider comparing tray materials, plastic trays require different care than acrylic or 3D-printed alternatives, and follow manufacturer guidelines for your specific tray type.
This article was written using GrandRanker