6 August 2026
Tips for Better Diamond Drill Placement: A Precision Guide
Table of Contents
- Why Diamond Drill Placement Matters
- Setting Up Your Workspace for Precision
- The Checkerboard Method for Diamond Painting
- How to Use a Multi-Placer for Diamond Painting
- Square vs Round Diamond Drill Placement Strategies
- Sectioning and Working in Manageable Areas
- Hand Positioning and Ergonomics for Extended Sessions
- Troubleshooting Common Placement Issues
Last Updated: August 7, 2026
Why Diamond Drill Placement Matters
The difference between a polished diamond painting and an amateurish one comes down to precise drill placement. Poor placement creates visible gaps, misaligned rows, and an uneven finish that undermines even beautiful artwork. When drills sit flush with proper alignment, the canvas reads as a unified, glittering surface. When scattered or crooked, every imperfection shows. This guide covers the specific strategies, tools, and methods that serious crafters use to achieve professional-quality results.
You're investing hours of focused work and real money in your canvas. Getting placement right the first time prevents frustration and rework, ensuring drills stay locked in place rather than popping off weeks later.
Setting Up Your Workspace for Precision
Your workspace setup determines placement accuracy. A poorly lit, disorganized area forces you to work by feel rather than sight.
Lighting and visibility essentials
Visibility is non-negotiable for accurate placement. A light pad transforms your ability to see the canvas grid, symbols, and drill positions clearly. Position your light pad directly under your canvas so the glow illuminates the entire working area without harsh shadows. An LED light pad designed for diamond painting is thin, affordable, and provides consistent brightness. Natural daylight is inconsistent and creates shadows from your hands and tools, so a dedicated light pad ensures consistent placement quality across sessions.

Organizing your tray and tools
An organized tray saves time and prevents placement errors. Use a compartmentalized tray with individual slots for each drill color, labeled to match your canvas legend. Keep your multi-placer, straightener tool, and wax pen within arm's reach. A shallow, wide tray with raised edges keeps drills contained and prevents them from rolling off your work surface.
The Checkerboard Method for Diamond Painting
The checkerboard method ensures full canvas coverage without gaps. Instead of filling rows sequentially, you fill every other position in a grid pattern, then return to fill the gaps. This approach creates natural alignment and prevents the tiled effect that happens when rows drift.
How the checkerboard pattern improves coverage
When you fill rows straight across, small placement errors accumulate. A drill slightly left in row one shifts the entire row, and by row ten you're noticeably off-grid. The checkerboard method breaks this chain reaction because each filled position is surrounded by empty space, providing visual reference points for alignment. The alternating pattern also forces you to slow down and focus on precision rather than working on autopilot.
Step-by-step checkerboard application
Start by placing drills in a checkerboard pattern: fill the first position, skip the next, fill the third, skip the fourth. Move to the second row and reverse the pattern. Once your checkerboard is complete, fill the gaps using surrounding drills as alignment guides. Each gap is surrounded by four placed drills, creating a natural frame that shows exactly where the new drill should sit. This is where precision happens, you're matching the frame created by adjacent drills rather than guessing at position.
How to Use a Multi-Placer for Diamond Drill Placement
A multi-placer holds multiple drills at once, allowing you to place 3-5 drills in a single motion. For serious crafters, this is essential equipment that speeds up work while maintaining precision if used correctly.
Selecting and loading your multi-placer
Choose a multi-placer with a comfortable grip and adjustable tension. Load drills of the same color into the slots, pressing each one until it seats securely in the wax. The wax in the multi-placer tip is critical, if too soft, drills fall out; if too hard, you can't seat them properly. Quality multi-placers come with replaceable wax tips. Test your loaded multi-placer on a practice area before working on your actual canvas.
Technique for consistent multi-drill placement
Position your multi-placer directly over the target area and lower it slowly. Press down gently and hold for a moment, then lift straight up without tilting. The key is straight-up release, if you twist or angle the tool, drills will shift as they release. Use a multi-placer for large blocks of the same color, and switch to a single-drill pen for detail areas or color transitions.
Square vs Round Diamond Drill Placement Strategies
Square and round drills require different placement approaches because their geometry affects how they sit on the canvas and how gaps appear.
Square drill alignment and precision requirements
Square drills create sharp, defined edges when placed correctly. Their straight sides mean any misalignment is immediately visible. Use the grid lines on your canvas as visual guides, positioning each drill so its edges align with the grid. Square drills demand more precision than round drills, but the payoff is a canvas that looks professionally finished.
Round drill placement and gap management
Round drills are more forgiving because their circular shape means small rotations are invisible. However, they create tiny gaps between each drill, embrace this rather than fighting it. These gaps catch light and create a subtle sparkle effect. To minimize visible gaps, focus on consistency: place each drill at the same depth in its pocket. Use a straightener tool to nudge drills down to a uniform level once you've placed a section.
Sectioning and Working in Manageable Areas
Divide your canvas into sections to keep you focused and prevent placement errors that compound across large areas. Choose section boundaries that make sense for your design, by color, location, or another logical division. Small sections, roughly 4 inches by 4 inches, fit comfortably in your field of vision without requiring head movement. Once you complete a section, step back and examine your work for gaps, misaligned drills, or areas where drills sit at different depths.
Hand Positioning and Ergonomics for Extended Sessions
Your hands will spend hours placing drills. Correct ergonomics let you work longer without pain or reduced precision.
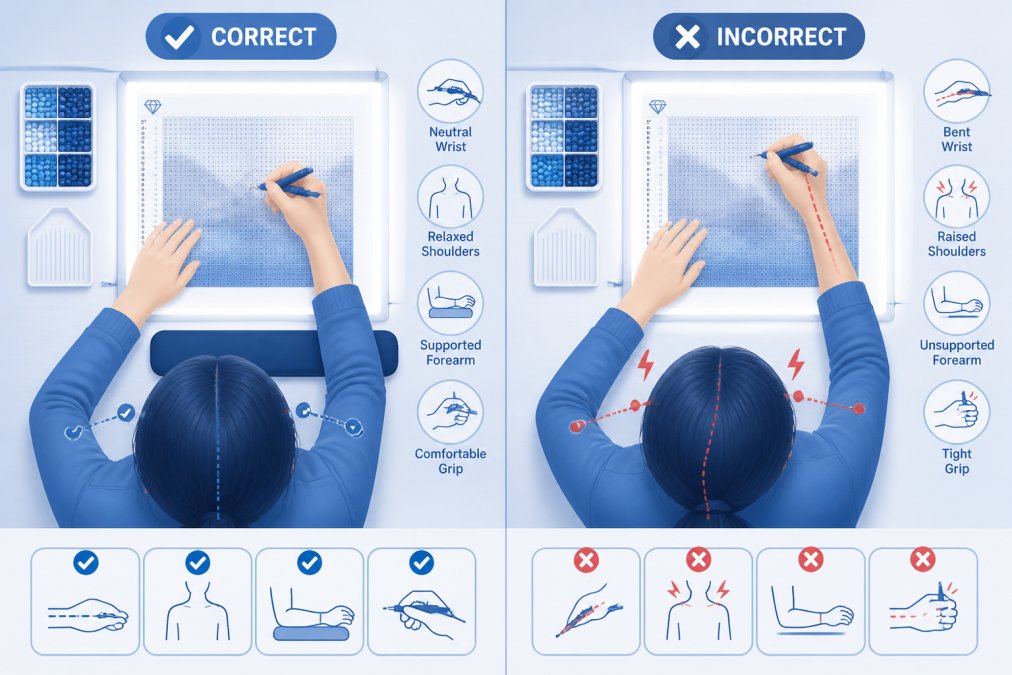
Hold your drill pen like you're writing, thumb and two fingers gripping the barrel, not strangling it. Support your forearm on the work surface with your elbow at roughly 90 degrees. Keep your wrist neutral, not bent backward or forward. Position your canvas at eye level or slightly below using a canvas holder or easel. Take breaks every 30-45 minutes to stand, stretch, and rest your eyes.
Troubleshooting Common Placement Issues
Even experienced crafters encounter placement problems. Knowing how to identify and fix them prevents frustration and rework.
Fixing gaps and misaligned drills
Gaps appear when drills don't sit flush against neighbors. Use a straightener tool to nudge drills into alignment, pressing gently and sliding sideways until they nestle against neighbors. For depth issues, use the straightener to press drills down evenly. If you notice row drift mid-project, pause and reassess using the grid lines as reference, then continue from the correct position.
Preventing and correcting popping drills
Drills pop off when adhesive loses grip due to poor-quality adhesive, environmental factors, or improper seating. Seat each drill firmly when you place it, pressing down with steady pressure for a moment. Store your canvas in a stable environment, not in hot cars or damp basements. If a drill pops off, clean the area gently, apply a tiny amount of clear craft adhesive to the drill's back, and press it into place.
Adhesive quality and canvas durability
The adhesive layer on your canvas determines how well drills stay in place and how long your finished piece lasts. Premium adhesives maintain tackiness through temperature changes and don't harden or crack over time. Budget canvases often use adhesive that hardens quickly or loses grip as it ages. When selecting a kit, adhesive quality is worth paying attention to. Protect your canvas from excessive heat and humidity, which accelerate adhesive degradation.
The difference between amateur and professional diamond paintings comes down to precision, technique, and the right tools. Mastering diamond drill placement takes practice, but the methods covered here, checkerboard application, multi-placer technique, proper sectioning, and correct ergonomics, give you the framework to achieve consistent, gallery-quality results.
At Jeanne Argent Atelier, we design our kits with these precision requirements in mind. Our full-drill kits include specialized drill pens and organized trays that support accurate placement. We source quality adhesive that holds drills securely throughout your project and beyond. When you invest in a premium kit with the right tools, you're setting yourself up for success. Explore our collection and find a design that inspires meticulous, rewarding work.
Frequently Asked Questions
What's the best technique for keeping diamond drills straight and aligned during placement?
Use a drill alignment tool or straightener to nudge drills into position before they fully set on the adhesive. Work in small sections with a light pad for visibility, and apply gentle pressure with your pen. The checkerboard method helps maintain grid consistency by filling alternating spaces first, then returning to fill gaps. Check alignment frequently as you work, correcting drills early prevents larger coverage issues later.
How does the checkerboard method improve diamond painting results?
The diamond painting checkerboard method involves placing drills in alternating squares across your canvas, similar to a checkerboard pattern. This technique prevents drills from being forced together, reduces gaps, and ensures even canvas coverage. By filling every other space first, you create a stable foundation, then fill remaining spaces without crowding. This approach is especially effective for achieving a consistent, professional tiled effect with minimal visible gaps.
What makes a multi-placer tool essential for precision drill placement?
A multi-placer tool holds multiple drills at once, allowing you to place 2-6 drills simultaneously with consistent spacing and alignment. This speeds up workflow while improving precision because the tool maintains uniform pressure and angle across all drills. Load the multi-placer with drills of the same color, position it over your canvas grid, and apply gentle, even pressure. This technique is particularly valuable for large, solid-color areas where consistency and speed matter.
Should I use square or round drills, and does it affect my placement technique?
Square drills offer better canvas coverage and create a more finished, tiled appearance with minimal gaps, ideal if precision and detail matter to you. Round drills are faster to place and more forgiving of slight misalignment, though they leave small gaps. Square drill placement requires more attention to grid alignment and straightening, while round drills allow slightly more relaxed positioning. Your choice depends on whether you prioritize speed or a flawless, gallery-quality finish.
This article was written using GrandRanker