2 September 2026
How to Start a Large Diamond Painting Project
Table of Contents
- Preparing Your Workspace for a Large Diamond Painting
- Understanding the Diamond Painting Sectioning Method
- Organizing Diamond Drills and Managing Inventory
- Best Tools for Large Diamond Painting Projects
- Ergonomics and Posture During Extended Sessions
- Diamond Painting vs Paint by Numbers: What You Need to Know
- Protecting Your Work and Planning Long-Term Storage
- Conclusion
- Featured Resources
- Frequently Asked Questions
Last Updated: September 3, 2026
Preparing Your Workspace for a Large Diamond Painting
A well-organized workspace transforms a large diamond painting project from frustrating to rewarding. Your setup should accommodate the canvas and tools within arm's reach on a dedicated table at least 36 inches wide, positioned near a window or light pad.
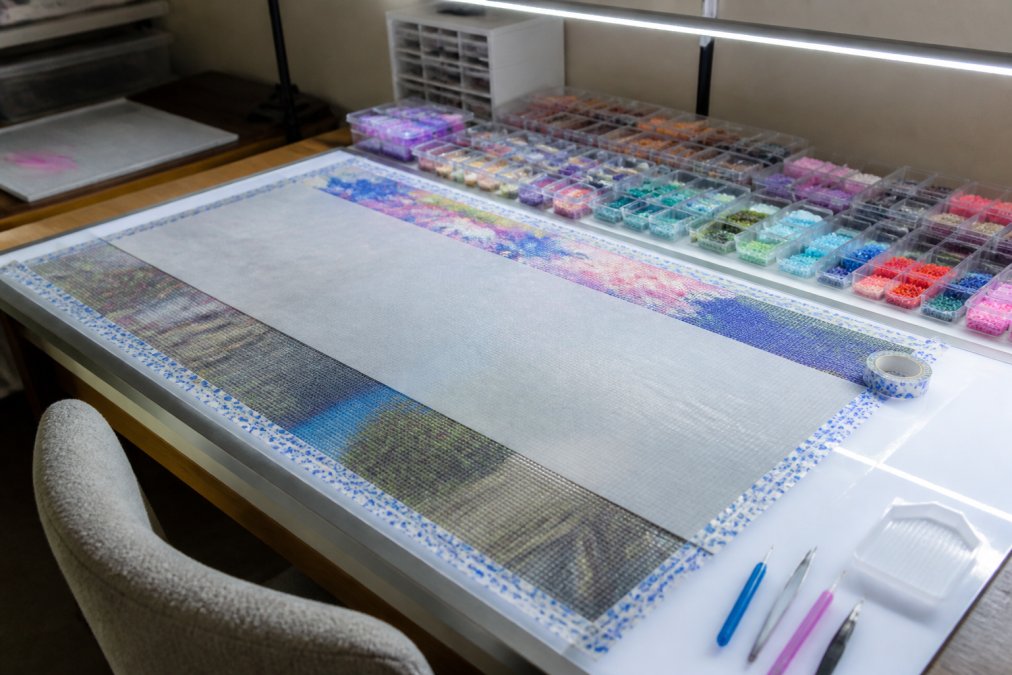
Secure the canvas flat using washi tape along the edges to prevent wrinkles and maintain consistent adhesive contact. Lighting is non-negotiable, poor lighting causes eye strain and misplaced diamonds. Position a light pad or LED work light at a 45-degree angle to eliminate shadows and make color symbols easy to read. Many crafters report that upgrading lighting alone reduces mistakes by half.
Keep your immediate workspace clear, reserving space only for your active color inventory, applicator tool, water cup, and current section. Store everything else within reach but outside your primary work zone.
Understanding the Diamond Painting Sectioning Method
The sectioning method breaks your canvas into manageable grid sections, allowing methodical completion rather than random jumping around. Divide your canvas into sections using printed grid lines or create your own with light pencil marks. Most crafters find 6x6 inch sections work well, though you can adjust based on comfort and canvas size.
Number your sections sequentially to prevent mental fatigue from deciding where to work next. Many experienced crafters start with a corner and work systematically across the canvas or in a spiral pattern from edges toward center. Mark completed sections with a sticker or by moving them aside to track visual progress.
Create a simple checklist tracking which sections are complete, in progress, or not yet started. This transforms an overwhelming 5,000-piece project into ten manageable 500-piece subsections, providing both practical workflow benefits and psychological momentum.
Organizing Diamond Drills and Managing Inventory
Diamond drill organization determines whether your project flows smoothly or devolves into frustrating searches. Sort every drill by color code before beginning, this takes 30 to 45 minutes upfront but saves exponentially more time during painting.
Arrange drill containers in numerical order or by color family, with frequently used colors within easiest reach. For large projects, invest in clear plastic organizers with divided compartments so you can see your entire inventory at a glance. Label each compartment with its color code.
Keep your printed color chart visible and laminated or in a clear plastic sleeve to stay clean throughout the project. Track drill inventory as you work, noting when colors are depleting. Knowing when you're running low prevents mid-session frustration.
Best Tools for Large Diamond Painting Projects
Premium applicator tools, trays, and accessories aren't luxuries, they're investments in your ability to complete the work comfortably. Your applicator tool is your primary instrument; for large projects, you'll use it for hours across multiple sessions. Quality pens have comfortable grips, responsive wax tips, and reliable suction. Jeanne Argent Atelier's specialized drill pens are designed for extended use with ergonomic grips that reduce hand fatigue.
A dedicated work tray with compartments and sloped design naturally feeds diamonds toward your applicator. For large projects, use multiple trays simultaneously for different color families or sections. A multi-placer tool that applies multiple diamonds at once can cut completion time by 20 to 30 percent in high-density color areas.
Protective parchment paper prevents accidental damage to completed sections as your hands brush previously placed diamonds. A light pad eliminates eye strain and makes symbol reading effortless, dramatically improving both accuracy and enjoyment.
Ergonomics and Posture During Extended Sessions
A large diamond painting project means 20 to 50+ hours of work. Your body's comfort directly impacts your ability to finish and your enjoyment of the process. Position your work surface so your elbows rest at roughly 90 degrees and your eyes naturally focus on the canvas without tilting your head down, your canvas should be at chest height.
Take regular breaks every 45 to 60 minutes, stepping away for at least 10 minutes to stand, stretch, and rest your eyes. A supportive chair with proper lumbar support prevents lower back pain during extended sessions. Hold your applicator tool lightly rather than gripping tightly; this reduces hand fatigue and improves control.
Simple hand stretches before and after crafting sessions prevent repetitive strain. For people with arthritis or hand sensitivity, Jeanne Argent Atelier's drill pens with ergonomic grips allow comfortable extended work.
Diamond Painting vs Paint by Numbers: What You Need to Know
Diamond painting and paint by numbers both use numbered symbols on canvas, but execution differs significantly. In paint by numbers, you apply paint to fill marked areas. In diamond painting, you place tiny faceted resin diamonds onto sticky canvas using an applicator tool. Diamond paintings have a luminous, three-dimensional quality that paint by numbers cannot achieve.
Diamond painting demands precision, each diamond must land on its corresponding symbol. A misplaced diamond in a detailed diamond painting disrupts the overall image. Completion time varies; comparable-sized diamond painting typically takes longer than paint by numbers because you're placing individual elements rather than covering area.
A completed diamond painting, when properly sealed, lasts indefinitely with maintained luminosity. Diamond painting is genuinely accessible to beginners requiring no artistic ability or prior crafting experience, and many find its meditative, repetitive process more engaging than brush application.
Protecting Your Work and Planning Long-Term Storage
Once completed, seal your large diamond painting to prevent diamonds from shifting or falling off. Use a clear gloss sealer or varnish applied lightly across the finished canvas, testing on an inconspicuous area first. Before sealing, inspect carefully for loose diamonds and press them firmly back onto the adhesive.
Store your completed work flat or rolled canvas-side-out. Avoid storing canvas-side-in, as this presses diamonds and causes dislodging. If rolling for storage, place parchment paper between canvas and roll to prevent friction damage. Store in a cool, dry location away from direct sunlight; excessive heat softens adhesive backing and sunlight fades the printed canvas.
If framing, use a frame deep enough that glass doesn't touch the diamond surface. Mat the piece if possible to create additional space and prevent dust accumulation. Photograph the finished work before storage to create a record of your accomplishment.
Conclusion
Starting a large diamond painting project is an ambitious creative undertaking that rewards careful preparation and the right tools. From workspace setup through completion and storage, each phase demands attention to detail. Jeanne Argent Atelier's premium full-drill kits, specialized drill pens, and ergonomic trays are designed specifically for large-scale projects. Our original artwork and high-quality materials ensure that your investment of time translates into a beautiful, durable finished piece. Get started with Jeanne Argent Atelier and transform your creative vision into a luminous masterpiece that will brighten your home for years to come.
Featured Resources
For more guidance on diamond painting techniques, explore creative hobby resources from craft communities that offer tutorials and peer support. Additionally, ergonomic guidelines for extended hand work provide evidence-based recommendations for posture and break schedules during repetitive crafting activities. For information on archival storage and preservation of completed artwork, consult conservation standards from the American Institute for Conservation.
Frequently Asked Questions
Where should I start on a large diamond painting canvas?
Start at the top center or a corner, depending on your sectioning method. Many crafters begin with the upper left corner to avoid smudging completed work. Use the grid method to divide your canvas into manageable sections, completing one section fully before moving to the next. This prevents overwhelming yourself and maintains workflow momentum on a large project.
How do you prevent diamond drills from popping off a large canvas?
Quality adhesive is critical. Ensure your canvas stays flat and protected with parchment paper or release paper between sections. Avoid excessive handling, keep the protective film on uncompleted areas, and store finished sections in a cool, stable environment. Proper storage containers help maintain adhesive integrity during long-term projects.
What's the difference between diamond painting and paint by numbers?
Diamond painting involves placing small resin or acrylic diamond drills onto an adhesive canvas using an applicator tool, creating a sparkling mosaic effect. Paint by numbers uses brushes and paint on a pre-drawn canvas. Diamond painting requires less artistic skill, produces a jeweled finish, and offers a more meditative, tactile experience. Both are screen-free creative activities, but diamond painting typically yields display-worthy finished pieces with dimensional appeal.
How do I manage a canvas larger than my light pad?
Divide your canvas into sections using the grid method or sectioning technique. Work on one section at a time under your light pad, keeping other areas covered with protective film or parchment paper. Use a color list and inventory system to track which sections are complete. This approach prevents mistakes, reduces eye strain, and allows you to pace yourself over multiple sessions without losing track of progress.
This article was written using GrandRanker