19 August 2026
Tips for Straight Diamond Painting Lines
Table of Contents
- Why Straight Lines Matter in Diamond Painting
- Essential Tools for Alignment: Metal Rulers and Straightening Tools
- The Checkerboard Method for Consistent Spacing
- Step-by-Step Technique for Straight Rows
- How to Fix Gaps in Diamond Painting
- Troubleshooting Crooked Rows and Common Mistakes
- Light Pads and Grid-Based Techniques for Accuracy
- Conclusion
Last Updated: August 20, 2026
Why Straight Lines Matter in Diamond Painting
Straight diamond painting lines separate a finished piece that looks polished from one that reads as amateur. When your drills align in clean rows and columns, the entire canvas gains visual cohesion. The patterns emerge clearly, the colors blend naturally, and the final display-worthy result justifies the hours you've invested.
This isn't about perfectionism for its own sake. Crooked rows create visual tension that catches the eye, but not in the way you want. Even if someone can't articulate what feels off about your work, they'll sense that something doesn't quite land. Straight lines, by contrast, guide the viewer's eye across the composition and make intricate designs read as intentional.
The challenge is that achieving straight diamond painting lines requires more than good intentions. It demands the right tools, deliberate technique, and an understanding of what actually causes misalignment. Many crafters assume that placing drills carefully is enough. It isn't. Adhesive quality, pressure consistency, section size, and even the type of drill you're using all factor into whether your rows stay true or drift into chaos.
At Jeanne Argent Atelier, we've worked with serious hobbyists who've completed dozens of kits, and the pattern is consistent: the difference between a mediocre result and a stunning one almost always comes down to technique and precision. Below, we'll show you exactly how to build straight diamond painting lines from the first row to the final drill.
Essential Tools for Alignment: Metal Rulers and Straightening Tools
The foundation of straight lines is having the right alignment equipment. A metal ruler and a dedicated straightening tool aren't luxuries, they're the difference between guesswork and precision.
Using a Metal Ruler for Precision
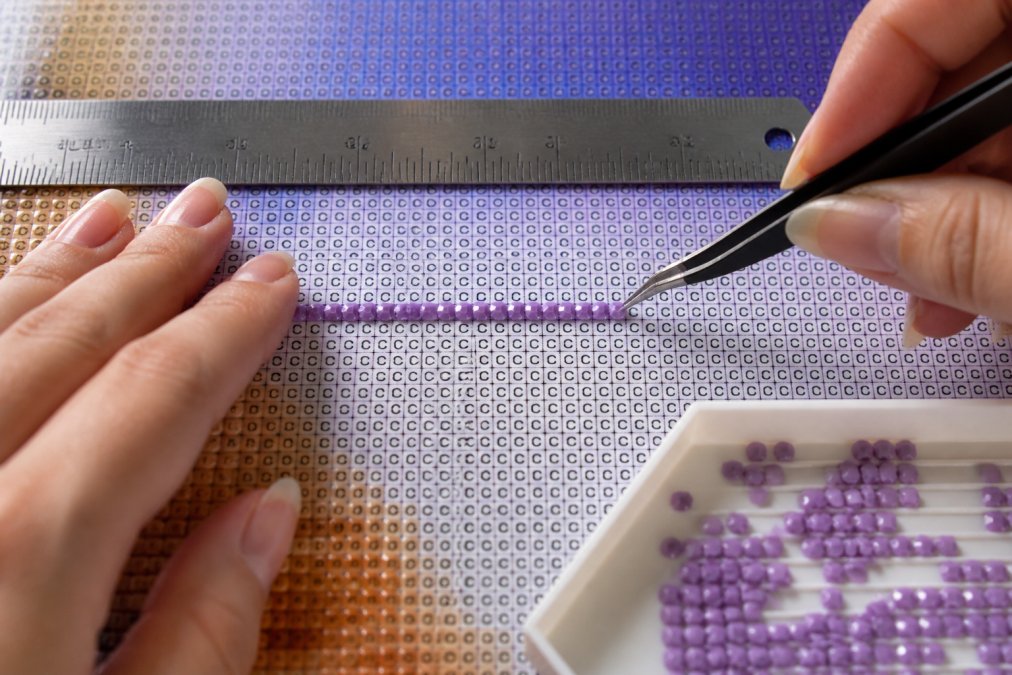
A metal ruler serves as your visual reference line and your physical guide. Unlike plastic rulers, metal doesn't flex or warp under pressure, and it provides a clean edge that drills can align against. When you're placing drills in a row, the ruler keeps your eye honest. It's easy to think a row is straight when you're focused on individual drill placement. A ruler reveals the truth immediately.
Position the ruler perpendicular to the rows you're working on, aligned with the grid on your canvas. Place drills along this edge, and you'll establish a baseline that subsequent rows can reference. The key is pressing the ruler firmly against the canvas so it doesn't shift mid-row. Some crafters tape the ruler down with painter's tape, this prevents accidental movement and is worth the extra step.
For round drills especially, a metal ruler becomes critical. Round drills roll more easily than square ones, and without a physical guide, they'll drift. Square drills are more forgiving, but a ruler still ensures consistency. The small investment in a quality metal ruler, typically inexpensive and reusable across every kit you complete, pays dividends in the finished product.
Benefits of a Dedicated Straightening Tool
A straightening tool (sometimes called a drill straightener or alignment tool) is specifically designed to nudge misaligned drills back into place without damaging them or the adhesive. Unlike improvised tools, a proper straightening tool has a flat, smooth surface that won't scratch your drills or canvas.
The real benefit emerges mid-project. As you're placing drills, some will inevitably sit slightly off-angle or rotated. Catching these in real time, rather than noticing them after the section is complete, saves you the frustration of having to remove and replace drills. A straightening tool lets you make micro-adjustments quickly, keeping your rows tight and aligned.
Use the straightener gently. The goal is subtle repositioning, not force. A light touch maintains the adhesive's integrity and prevents drills from popping off later. Many crafters make the mistake of using too much pressure, thinking a firmer push will help. It won't. Gentle, deliberate adjustments work better and preserve the bond between drill and canvas.
The Checkerboard Method for Consistent Spacing
The checkerboard method is a foundational technique for maintaining consistent spacing and preventing gaps. Instead of filling rows sequentially from left to right, you stagger your placement like a checkerboard pattern. This approach distributes your pressure more evenly and reduces the likelihood of drills settling unevenly.
Here's how it works: imagine your canvas divided into a grid. In the first pass, place drills in every other square, both horizontally and vertically, creating a checkerboard pattern. Once this first layer is complete, fill in the gaps. This two-pass approach has several advantages.
First, it prevents the compounding effect of pressure. When you fill a solid row, each drill you place exerts downward pressure on the ones beside it. By staggering placement, you reduce this cascading pressure and allow the adhesive to set more evenly. Second, the checkerboard method makes spacing errors immediately visible. If your drills are drifting, you'll spot it in the first pass and can adjust before committing to the full grid.
Many experienced crafters swear by this technique because it forces intentionality. You can't rush through a checkerboard pattern. The deliberate pacing actually improves precision. When you work methodically, you're more likely to notice misalignments and correct them before they compound across multiple rows.
Step-by-Step Technique for Straight Rows
Achieving straight diamond painting lines requires a systematic approach. The steps below build on one another, so follow them in order for the best results.
Starting from the Center
Begin at the center of your canvas, not the edges. This might seem counterintuitive, but it's a game-changer for maintaining alignment. When you start from the center and work outward, you establish a strong anchor point. Any minor deviations spread symmetrically in both directions, rather than accumulating in one direction as they would if you started from a corner.
Locate the center point on your canvas grid. Mark it lightly with a pencil if needed. Place your first drill at this center point with extra care, this is your reference. Use your metal ruler to align the drills immediately adjacent to this center point. Once you have three drills in a perfect line, you've established your baseline. All subsequent rows reference this initial line.
Starting from the center also means you're working on fresh, unstressed canvas. The edges often see more handling and potential adhesive degradation. By prioritizing the center, you're placing your most critical drills on the most stable surface.
Working in Small Sections
Divide your canvas into manageable sections, roughly 4 inches by 4 inches is ideal. Complete one section fully before moving to the next. This prevents the compounding effect of pressure that happens when you work on large areas at once.
When you work on a small section, you can maintain consistent pressure and ensure every drill sits at the same depth. Larger work areas make this nearly impossible. Your hand angle changes, your pressure varies, and drills at the far edge of your work zone end up sitting differently than those near your body.
The small-section approach also makes troubleshooting easier. If something goes wrong, a row drifts, spacing becomes inconsistent, you've only compromised a limited area. You can step back, assess, and correct without having wasted hours on a large section that needs rework.
Handling Round vs. Square Drills
Round drills and square drills require slightly different handling. Square drills are more stable and forgiving. They naturally resist rolling and tend to maintain alignment better. Round drills, by contrast, are prone to rotation. They'll twist in their placement and drift from alignment if you're not vigilant.
For round drills, use your straightening tool more frequently. Make micro-adjustments as you place each drill, ensuring it sits in the correct orientation. Don't assume a round drill is positioned correctly just because it's placed. Check it. A slight twist can accumulate across a row and become a visible problem.
For square drills, focus more on consistent spacing. Square drills won't roll, but they can be placed too close together or too far apart. Use your ruler to verify spacing regularly. Consistency in spacing is what matters most with square drills.
Many serious crafters prefer square drills specifically because they reduce the variables you need to manage. If you're new to achieving straight diamond painting lines, starting with a kit that uses square drills removes one layer of complexity.
How to Fix Gaps in Diamond Painting
Gaps between drills are one of the most common frustrations. They happen when drills settle unevenly, when adhesive loses tackiness, or when pressure distribution is inconsistent. Understanding how to identify and prevent gaps, and how to close them when they appear, is essential.
Identifying and Preventing Gaps Before They Start
Gaps often start small and become visible only after you've moved on. The best approach is prevention. As you work, examine completed sections from different angles and lighting. Gaps are easiest to spot under bright, angled light. Look for any space between adjacent drills.
Gaps usually signal one of three issues: insufficient pressure during placement, inconsistent adhesive quality, or drills settling after placement. Address pressure first. When you place a drill, press down firmly for 2-3 seconds. Don't just tap it, apply sustained, even pressure. This gives the adhesive time to grip.
Adhesive quality is the second factor. If your canvas adhesive has lost tackiness, no amount of pressure will prevent gaps. Test the adhesive on a small area of your canvas before starting. Press a drill down and try to lift it. It should resist. If it lifts easily, the adhesive may be compromised. This is where kit quality matters significantly. Premium kits use higher-quality adhesive that maintains tackiness throughout the project.
The third factor is settling. Drills sometimes shift slightly after placement as the adhesive cures. This is normal, but excessive settling creates gaps. Minimize settling by avoiding unnecessary movement or vibration near completed sections. Don't bump the canvas, don't work too quickly, and don't apply pressure to adjacent drills immediately after placing a new one.
Using a Roller to Lock Diamonds and Close Gaps
A roller tool (sometimes called a diamond roller or pressure roller) is designed to compress drills and close gaps. Unlike a straightening tool, which reposition individual drills, a roller applies even pressure across a section, pressing drills down and closing any spacing issues.
Use a roller after completing a section. Roll gently across the area with consistent, moderate pressure. You're not trying to crush the drills, you're pressing them into the adhesive to ensure full contact and close any gaps that have developed. A light touch is more effective than aggressive pressure. Aggressive rolling can actually pop drills or damage the canvas.
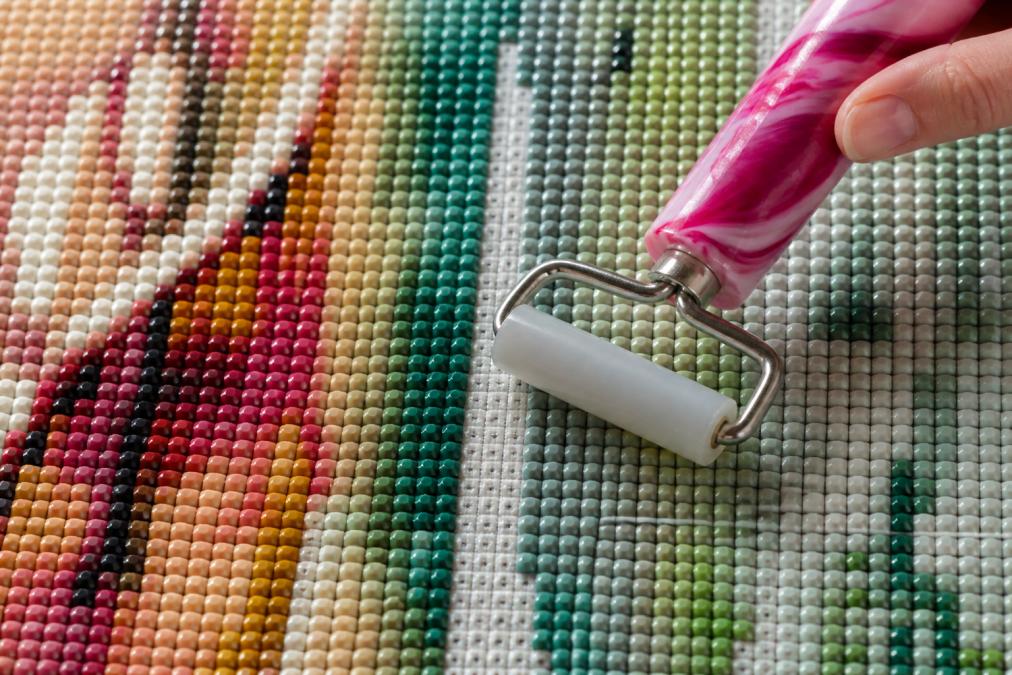
The roller is particularly effective when used in conjunction with the checkerboard method. After completing your first pass with the checkerboard pattern, roll the section. This presses the first layer of drills down and closes any settling gaps. Then fill in the checkerboard gaps and roll again. This two-roll approach ensures maximum contact and minimal gaps in the finished section.
Troubleshooting Crooked Rows and Common Mistakes
Crooked rows happen to every crafter at some point. The causes are usually identifiable and correctable. Understanding what goes wrong helps you prevent it in future kits.
Why Diamonds Pop Off and How Adhesive Quality Affects Placement
Drills pop off for one primary reason: insufficient adhesive contact. This can happen immediately after placement or days later. The cause is usually adhesive quality or improper pressure during placement.
When you press a drill down, you're creating contact between the drill's flat bottom and the sticky canvas surface. If that contact isn't full, if there's any air gap, the drill will eventually pop off. Improper pressure is the most common culprit. Tapping a drill lightly isn't enough. You need sustained pressure for 2-3 seconds to ensure the adhesive grips the entire bottom surface of the drill.
Adhesive quality is equally important. Canvas adhesive degrades over time and with exposure to heat, light, and air. A kit that's been sitting in a warehouse for months may have lost adhesive tackiness. This is a real issue with lower-quality kits. Premium kits are formulated with adhesive that maintains tackiness throughout the project timeline, even in challenging conditions.
If drills are popping off consistently, check the adhesive first. Press a new drill onto an unused area of the canvas and try to lift it. If it lifts easily, the adhesive is compromised. You have limited options at this point, you can try applying a small amount of craft glue under each drill as you place it, but this is tedious and inconsistent. Prevention is far better than remediation.
Ergonomic Strain Prevention During Long Sessions
Long diamond painting sessions create physical strain, particularly in your hands, wrists, and shoulders. This strain affects precision. When your hand hurts, you tense up, your pressure becomes inconsistent, and your alignment suffers.
Invest in proper tools designed for comfort. A high-quality drill pen with an ergonomic grip reduces hand fatigue significantly. Specialized trays that keep drills organized and within easy reach minimize reaching and repetitive strain. Position your work surface at a comfortable height, ideally slightly below elbow height when your arms are at rest. This reduces shoulder strain.
Take breaks every 30-45 minutes. Stand up, stretch, and give your hands a rest. This isn't wasted time, it's essential maintenance that keeps you working at peak precision. Fatigue is one of the biggest drivers of sloppy placement and crooked rows.
Many crafters don't realize how much their physical comfort affects their work quality. When you're comfortable, you're more patient, more precise, and more likely to catch and correct mistakes in real time. When you're uncomfortable, you rush, you miss details, and your rows drift. The physical experience of crafting is inseparable from the quality of the finished piece.
Light Pads and Grid-Based Techniques for Accuracy
A light pad (or light box) positioned beneath your canvas makes the grid pattern dramatically clearer. This clarity is transformative for maintaining straight lines. When you can see the grid clearly, alignment becomes almost automatic.
Position your light pad so the grid is visible without glare. The goal isn't brightness for brightness's sake, it's clarity. A properly lit grid shows you exactly where each drill should sit. You can reference the grid lines directly rather than relying on your eye to judge alignment.
Grid-based techniques work because they remove ambiguity. Instead of eyeballing whether a drill is in line with its neighbors, you're placing it on a grid intersection. The grid does the alignment work for you. This is why light pads are particularly valuable for complex designs with many rows and columns. The grid becomes your guide, and straight lines follow naturally.
Some canvas designs use more prominent grid lines than others. If your canvas has faint grid lines, a light pad compensates. If your canvas has bold, clear grid lines, a light pad enhances them further. Either way, the investment in a light pad pays dividends in accuracy and finished quality.
Achieving straight diamond painting lines is the difference between a project that looks handmade and one that looks professionally executed. It requires the right tools, metal rulers, straightening tools, rollers, and light pads, combined with deliberate technique: starting from the center, working in small sections, maintaining consistent pressure, and using methods like the checkerboard approach to distribute pressure evenly.
The real challenge isn't understanding these techniques. It's committing to them consistently, even when you're tired or eager to see progress. Precision takes time. But the finished piece, a gallery-worthy display with perfectly aligned rows and no gaps, justifies every extra minute.
Jeanne Argent Atelier kits are built for this level of precision. Each kit includes specialized drill pens and trays designed to support proper technique, paired with high-quality adhesive that maintains tackiness throughout your project. When your tools support your technique, straight lines stop being difficult. They become inevitable.
Frequently Asked Questions
Why are my diamond painting lines crooked?
Crooked lines typically result from inconsistent pressure, misaligned starting points, or poor adhesive quality. Use a metal ruler or straightening tool to guide each row, and ensure your canvas has adequate tackiness. Check that your drill pen applies uniform pressure, too light and drills shift, too heavy and they pop off. Starting from the center and working outward also helps maintain alignment across the entire canvas.
What is the checkerboard method in diamond painting?
The checkerboard method involves placing drills in alternating pattern before filling gaps, similar to a checkerboard grid. This technique helps maintain spacing and alignment by giving you visual reference points. Start with every other square in your grid, then fill the remaining squares. This approach reduces the chance of crooked rows because you're working with established spacing guidelines rather than trying to align each drill individually.
Do I really need a diamond painting straightening tool?
While not mandatory, a straightening tool significantly improves precision and reduces hand strain during long sessions. These tools are designed specifically for diamond painting and typically feature a straightening edge that guides drills into perfect alignment. A metal ruler works as an alternative, but a dedicated straightening tool offers better ergonomic support and faster placement, especially on large canvases or detailed sections.
How do you keep diamond drills straight on a large canvas?
For large canvases, divide the design into manageable sections and complete one section at a time using the checkerboard method or a grid-based approach. Use a light pad to see your grid clearly and reduce eye strain. Apply consistent pressure with your drill pen, and use a metal ruler or straightening tool for every row. Check your alignment frequently, and use a roller to compress drills and close gaps before moving to the next section. This prevents errors from compounding across the entire canvas.
This article was written using GrandRanker