2 August 2026
Diamond Painting Tips for Beginners: Start Right in 2026
Table of Contents
- Getting Started with Diamond Painting: What Beginners Need to Know
- Best Diamond Painting Tools for Beginners: Essential Supplies Explained
- Step-by-Step Application Process: Mastering the Technique
- Common Mistakes and How to Fix Diamond Painting Problems
- How to Seal Diamond Painting and Protect Your Finished Work
- Advanced Tips for Diamond Painting Success as a Beginner
- Conclusion
Diamond Painting Tips for Beginners: Start Right in 2026
Last Updated: August 3, 2026
Diamond painting can feel overwhelming without proper guidance. The difference between those who finish strong and those who quit early comes down to preparation and technique. Master a few key principles about adhesive, tool selection, and workspace setup, and you'll complete your first project with results you're genuinely proud of.
Getting Started with Diamond Painting: What Beginners Need to Know
A diamond painting kit contains four essential components: a pre-printed canvas with adhesive backing, small resin diamonds (called drills), an applicator pen for placing them, and organizational tools. The canvas has a sticky surface designed to hold drills permanently, but only if you use the right technique.
Why Canvas Quality and Adhesive Matter
The adhesive layer on your canvas is everything. Poor-quality adhesive means drills pop off within weeks; premium adhesive keeps them secure for years. When you receive your canvas, check that the sticky surface feels uniform and tacky to the touch.
The release paper covering the adhesive protects the stickiness until you're ready to work. Never remove the entire sheet at once. Instead, peel back only the section you're actively working on, then recover it when you take a break. This prevents dust and debris from settling on the exposed adhesive.
Temperature matters more than most beginners realize. Adhesive becomes less effective in cold environments. Ideally, work in a space between 65-75°F. If your workspace is cold, let your kit sit out for 30 minutes before starting.
Understanding Your Kit: Symbols, Color Codes, and DMC Charts
Your canvas is covered in tiny symbols or numbers that correspond to specific drill colors. A DMC chart (the color key included with your kit) matches each symbol to a drill color. Before you start, spend five minutes studying the chart and locating the most common colors in your design.
The grid printed on your canvas helps with alignment. Use these faint grid lines to ensure rows of diamonds stay straight and gaps don't appear between sections.
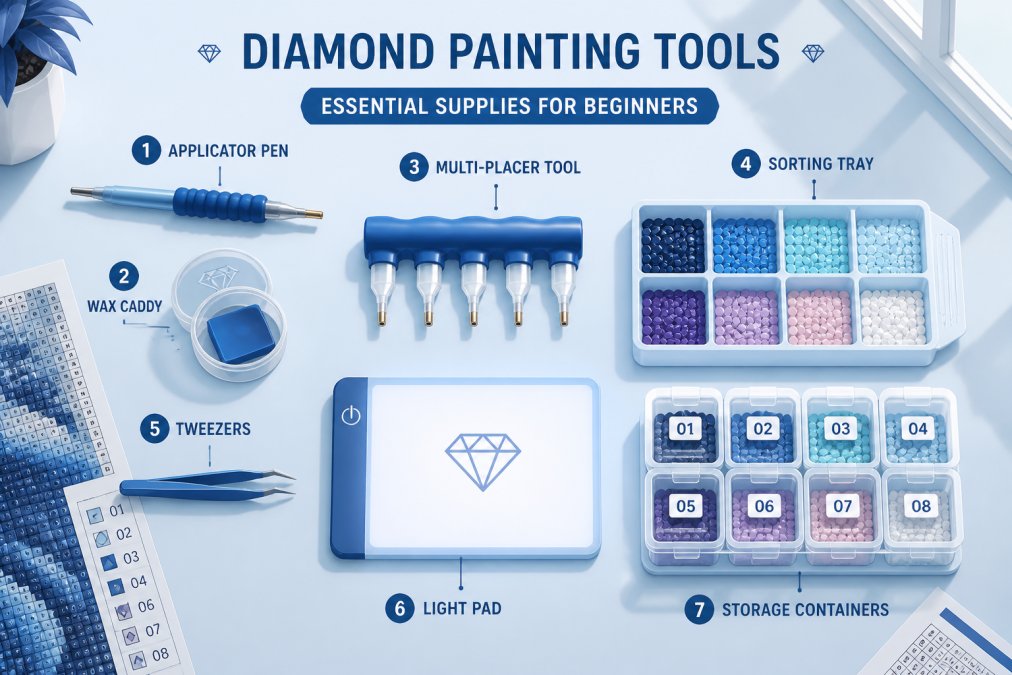
Best Diamond Painting Tools for Beginners: Essential Supplies Explained
The tools you choose directly impact comfort, speed, and final quality.
Applicator Pens and Multi-Placers: Finding What Works for Your Hand
An applicator pen (also called a drill pen or picker) uses a small wax tip to pick up individual drills and place them on the canvas. Entry-level pens have thin, rigid tips that require constant pressure. Premium pens have ergonomic grips and softer wax that picks up drills with minimal pressure. If you're planning to work for more than 30 minutes at a time, invest in a better pen.
A multi-placer (or multi-applicator) picks up and places 3-6 drills simultaneously, cutting placement time by 40-60% for large, single-color sections. However, they don't work well for intricate sections with frequent color changes. Most experienced painters use both tools in the same project.
The wax caddy keeps your applicator pen's tip sticky. Dip your pen tip into the caddy every 10-15 placements to refresh the wax.
Trays, Wax Caddies, and Organization Systems
A diamond tray is a shallow container with individual compartments, each sized to hold one color of drill. Load your tray with 5-10 colors you'll use in your current session. Look for trays with compartments deep enough to hold drills without spilling but shallow enough to access them easily.
Before each session, sort your drills by color using your DMC chart. Place sorted drills in labeled storage containers; clear containers work best so you can see colors at a glance.
Light Pads, Tweezers, and Ergonomic Considerations
A light pad (a thin LED panel) sits under your canvas and illuminates the design from behind, making symbols and grid lines much easier to see and reducing eye strain. Light pads are optional but strongly recommended.
Tweezers are helpful for correcting misplaced drills without damaging the canvas.
Ergonomics matter more than beginners expect. Set up your workspace so your elbows rest at 90 degrees and your wrists stay neutral. Your canvas should sit at eye level or slightly below to prevent neck strain. Take breaks every 30-45 minutes to prevent fatigue and maintain work quality.
Step-by-Step Application Process: Mastering the Technique
The actual process of placing diamonds is straightforward once you understand the mechanics.
Preparing Your Workspace and Canvas
Clear your workspace completely and wipe down surfaces. Dust and debris settling on exposed adhesive compromises drill adhesion.
Lay your canvas flat on a hard, level surface. Avoid soft surfaces like beds or couches, which create uneven pressure and prevent drills from seating properly. Position your light pad under the canvas if using one. Place your tray of sorted drills and wax caddy within arm's reach.
Sorting Drills and Setting Up Your Tray System
Before you place a single drill, sort all your drills by color using the DMC chart. This takes 15-20 minutes but saves hours of frustration later.
Use labeled containers or bags to keep sorted drills organized. Load your working tray with 5-10 colors you'll use in your current session, starting with the most common colors in your design section.
Placing Diamonds: Straight Lines, Alignment, and Avoiding Gaps
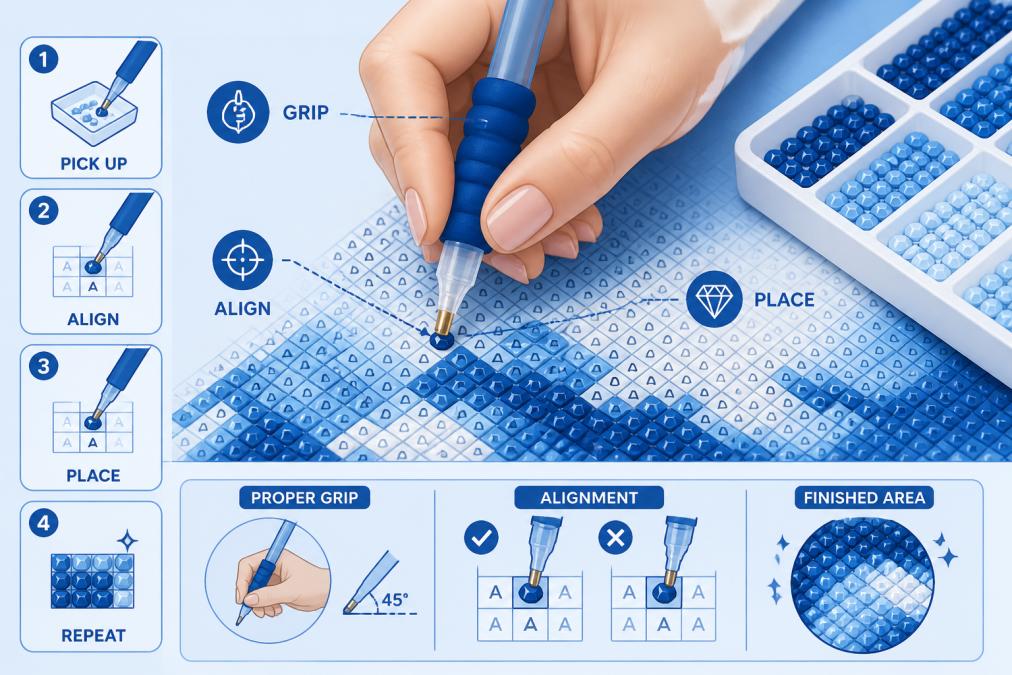
Dip your applicator pen's wax tip into your caddy to refresh the wax. Press the tip gently onto a drill, it should stick without effort. Pick up the drill and place it on the canvas, aligning it with the corresponding symbol. Press down firmly but briefly, about one second of pressure.
Work in rows or sections, not randomly. Start at the top-left corner and work horizontally across each row. This systematic approach keeps your alignment consistent.
Alignment is critical for a professional appearance. Use the grid printed on your canvas as your guide. If you place a drill in the wrong spot, use tweezers to lift it out immediately while the adhesive is still tacky.
Common Mistakes and How to Fix Diamond Painting Problems
Problems happen. The key is catching them early and knowing how to fix them.
Troubleshooting Adhesive Issues and Drills That Pop Off
If drills are popping off after placement, your adhesive has likely degraded. Try pressing drills more firmly, holding each in place for 2-3 seconds instead of one second. If this doesn't work, use a clear adhesive spray (available at craft stores) on completed sections to lock drills in place permanently.
Some drills pop off because they weren't seated properly during placement. If you notice a drill sitting slightly proud (sticking up above its neighbors), press it down again. You'll feel it sink into the adhesive as it seats correctly.
Fixing Curled Canvas and Flattening Techniques
Canvas curling is common, especially on kits stored in dry environments. The simplest fix is weight and time. After completing your painting, lay it flat under a heavy book or board for 24-48 hours.
For active curling during work, tape the canvas corners to your work surface using low-tack painter's tape or washi tape. Washi tape is preferred because it's less likely to damage the canvas when removed.
Addressing Misplaced Diamonds and Incomplete Sections
If you've placed a drill in the wrong spot and the adhesive has already set, use tweezers to lift it out carefully. Grip the drill at its edge and pull straight up with steady, gentle pressure. Once removed, wipe away any adhesive residue with a soft cloth, then place the correct drill in that spot.
How to Seal Diamond Painting and Protect Your Finished Work
A completed diamond painting is delicate. Without protection, drills can collect dust, become loose, or lose their shine. Sealing adds durability and maintains appearance long-term.
Sealing Options: Resin, Varnish, and Alternative Methods
Clear resin is the most popular sealing method. A thin layer of UV resin applied over the finished painting locks drills in place and creates a protective, glossy finish. To apply resin, lay your finished painting flat and pour a thin, even layer over the entire surface. Use a spreader or brush to distribute it uniformly. Most cure fully in 24 hours under UV light or in sunlight.
Acrylic varnish is a simpler alternative. A spray or brush-on acrylic varnish (matte or gloss finish) seals the surface without the complexity of resin. Apply 2-3 thin coats, allowing each coat to dry fully before applying the next.
Framing and Display Considerations
A shadow box frame (a deep frame designed for 3D art) is ideal for diamond paintings because it accommodates the raised surface of the drills. Measure your finished canvas and order a frame that fits snugly without forcing the canvas.
Mount the canvas to the frame's backing using acid-free tape or mounting corners. Never use glue or staples, which can damage the canvas or drills.
Display your finished painting away from direct sunlight to prevent color fading. Avoid high-humidity environments, which can degrade adhesive and encourage mold.
Advanced Tips for Diamond Painting Success as a Beginner
These techniques separate experienced painters from novices and make the work faster and more enjoyable.
Working with Round vs. Square Drills
Most kits use square drills, which fit together tightly with minimal gaps and create a more polished, mosaic-like appearance. Round drills have a different aesthetic and are slightly harder to place because they can rotate and misalign more easily. If you're a beginner, stick with square drills until you're comfortable with the basic technique.
Organizing Storage and Preventing Spills
Use labeled, sealed containers for sorted drills. Clear plastic organizers with drawers or compartments work well. Label each compartment with the color code and symbol so you can quickly identify what you need.
During work sessions, keep your tray elevated and centered on your work surface. Never position it near the edge where it could be easily knocked over.
Maintaining Comfort During Long Sessions
Sit upright with your back supported by a chair. Your elbows should rest at 90 degrees, and your wrists should remain neutral. Your canvas should sit at or slightly below eye level.
Take breaks every 30-45 minutes. Stand, stretch your hands, wrists, and shoulders, and look away from the canvas to rest your eyes.
Consider wearing a wrist support or brace if you have existing wrist pain or arthritis. Use hand cream or lotion before and after sessions to keep skin healthy and reduce irritation.
| Mistake | Cause | Solution |
|---|---|---|
| Drills popping off | Degraded adhesive or improper seating | Press firmly for 2-3 seconds; apply fixative spray to completed sections |
| Canvas curling | Storage in dry environment or heat exposure | Place under weight for 24-48 hours; use tape to hold flat during work |
| Gaps between drills | Misalignment or rushing | Work systematically; use grid lines as guides; slow down |
| Hand fatigue | Poor ergonomics or extended sessions | Set up proper workspace; take breaks every 30-45 minutes |
| Misplaced drills | Inattention or symbol confusion | Use tweezers to remove; verify symbol before placing |
| Dust on finished piece | Unsealed surface in dusty environment | Seal with resin or varnish; frame in dust-proof display |
Diamond painting rewards patience and attention to detail. The projects that turn out best aren't necessarily the ones completed fastest, they're the ones where the painter invested time in setup, used quality tools, and worked methodically through each section.
The difference between a frustrating first project and a rewarding one often comes down to one thing: quality supplies and proper technique. At Jeanne Argent Atelier, our full-drill kits are designed for a high-quality creative experience. Each kit includes specialized applicator pens and trays, and premium adhesive. Our canvases feature clear DMC charts and precisely printed grid lines. Start with a kit designed for success, apply these techniques, and you'll complete a piece you're genuinely proud to display.
Frequently Asked Questions
What makes the best diamond painting tools for beginners different from basic kits?
Quality tools reduce hand fatigue and improve accuracy. Ergonomic applicator pens, multi-placers that grip multiple drills, and organized trays with wax caddies speed up your work and make placement more precise. Better adhesive on the canvas means diamonds stay put instead of popping off. Premium kits include clearer symbols and color codes that are easier to read, plus release paper that protects the sticky surface until you're ready to work.
How do I fix diamond painting mistakes like misplaced drills or curled canvas?
For misplaced diamonds, use tweezers to gently lift them off and reposition. If drills won't stick, the adhesive may have lost tack, try pressing them firmly or using a light pad underneath to warm the canvas slightly. For curled canvas, place a heavy flat object on top overnight, or carefully use a heat gun on low setting held several inches away. Never fold the canvas. If sections have gaps, check that your diamonds are fully seated and not sitting at angles.
What's the best way to seal a finished diamond painting to protect it?
Clear resin coating is the most durable option, it hardens into a protective shell and enhances the sparkle. Apply thin, even coats and let cure fully between applications. Alternatively, use a clear acrylic varnish spray from a distance to avoid pooling. For a non-permanent option, a clear gloss spray works but offers less protection. Always work in a ventilated space and follow product instructions. Avoid touching the surface until fully cured, and consider framing under glass for extra protection from dust and handling.
Should I start diamond painting from the top or bottom of the canvas, and how do I keep lines straight?
Start from the top and work downward to avoid resting your hand on completed sections. Use the grid lines printed on the canvas as your guide, and work in small sections at a time. Place a ruler or straight edge alongside your current working area to stay aligned. If using washi tape to mark sections, it also helps keep your placement organized. Take breaks every 30-45 minutes to rest your eyes and hands, this prevents fatigue that causes misalignment. Some crafters find a light pad under the canvas helps them see grid lines more clearly.
This article was written using GrandRanker